Platform Overview
Fuzzing Terminology
Install the Fuzzbuzz CLI
Find your first C/C++ bug
Find your first Python bug
Find your first Rust bug
Find your first Go bug
Protocol Fuzzing
Seeding your fuzzer
Integrating with libFuzzer
Heartbleed in 5 Minutes
GitHub Integration
GitLab Integration
CLI Integration
fuzzbuzz.yaml reference
Fuzzer Reference
Bug Types
Self-Hosted Fuzzbuzz
Overview
Getting Started
Guides
Tutorials
Integrations
Reference
Find your first bug in Python
This Getting Started guide will walk you through an end-to-end demo of the Fuzzbuzz platform, from setting up a project all the way to finding and fixing a bug.
Step 1: Get the code
First, clone the tutorial code to your machine:
git clone https://github.com/fuzzbuzz/getting-started-python
Step 2: Project Layout
tree
.
├── fuzz
│   ├── fuzzauthlib.py
│   ├── fuzzauthlib.ts
│   ├── fuzzbs.py
│   ├── fuzzbs.ts
│   ├── fuzzscrapy.py
│   └── fuzzscrapy.ts
├── fuzzbuzz.yaml
└── requirements.txt
This repository consists of a basic Python project with a requirements.txt that lists dependencies for scrapy, bs4, and authlib. Fuzz tests for these libraries are placed in the fuzz/ directory, and consist of a Typescript file that contains the fuzzer configuration, along with an optional Python file for operations that can't be done in Typescript.
Step 3: Integrating Fuzzbuzz
First, we need to tell Fuzzbuzz how to set up our code, which is usually just one command, but will vary project to project. For this project, we use pip to install dependencies from the vendor directory. Specifically, we run the following from the project directory to install dependencies into virtualenv:
pip install -r requirements.txt --no-index --find-links file://${PWD}/vendor
To start fuzzing, first make sure you've installed the Fuzzbuzz CLI.
Once installed, you can run
fuzzbuzz init
which will have the CLI guide you through creating your fuzzbuzz.yaml file. For more info on configuration options, you can check out the fuzzbuzz.yaml reference.
The CLI will ask you basic configuration questions like what to name the configuration, the language you'd like to test, and how to build your code. We selected Python, and entered the pip command from earlier.
Below is an example of what the final output looks like:
Creating fuzzbuzz.yaml in /home/user/src/fuzzbuzz/getting-started-python
For more information on configuring your project to work with Fuzzbuzz, please visit:
    https://beta.fuzzbuzz.io/docs/reference/yaml

Project Name: getting-started-python
Project Language: Python
Existing Tests: No
Build Steps:
    `pip install -r requirements.txt --no-index --find-links file://${PWD}/vendor`

✔ Fuzzbuzz yaml created at /home/user/src/fuzzbuzz/getting-started-python/fuzzbuzz.yaml

That's it! If you'd like to modify or further configure Fuzzbuzz, you can edit the fuzzbuzz.yaml directly.

Now that Fuzzbuzz is configured, you'll want to write your first fuzz test.

Head over to https://beta.fuzzbuzz.io/docs/getting-started-in-python to learn more.

Then, run:

    $ fuzzbuzz build
    $ fuzzbuzz check

For further help, the Fuzzbuzz team is very active in Slack: https://slack.fuzzbuzz.io
This is the only configuration Fuzzbuzz needs to get started.
If you look at the generated fuzzbuzz.yaml, you should see a file similar to:
cat fuzzbuzz.yaml
getting-started-python:
  language: python
  steps:
    - run: pip install -r requirements.txt --no-index --find-links file://${PWD}/vendor
In most cases, Fuzzbuzz will be able to automatically analyze, instrument, and fuzz your code without any extra tweaking or input. You can read about how this works in the Fuzzer Reference section.
Step 4: Adding a Fuzz Test
Now that we've told Fuzzbuzz how to build our codebase, we need to actually add some fuzz tests. This repository comes with three, one for each of the libraries it depends on.
First, take a look at fuzz/fuzzscrapy.py. It contains a test function for the fuzzer to execute, which does the initialization of the Scrapy LinkExtractor using the body string variable. The fuzzer will repeatedly run this function with new unique inputs.
from scrapy.linkextractors import LinkExtractor
from scrapy.http import TextResponse

def fuzz_linkextractor(body):
    r = TextResponse("http://somewhere/", encoding="utf-8", body=bytes(body))
    le = LinkExtractor()
    links = le.extract_links(r)
Next, take a look at fuzz/fuzzscrapy.ts. This contains the actual configuration for the fuzz test:
// Import the Fuzzbuzz configuration modules
import { Fuzzer, FuzzTarget } from "fuzzbuzz";
import { ByteArray, String } from "fuzzbuzz/generator";
// Import the Fuzzbuzz Python language bindings
import * as python from "fuzzbuzz/lang/python";

// Import the fuzzscrapy Python module
const fuzzscrapy = python.importModule("fuzzscrapy");

export function FuzzLinkExtractor(f: Fuzzer) {
    // Create a string generator with max length 4096
    const body = new String("body");
    body.setMaxLength(4096);

    // Set up a fuzz target that uses the string generator to fuzz
    // the fuzz_linkextractor function in the fuzzscrapy module
    const target = new FuzzTarget((body: string): void => {
        fuzzscrapy.fuzz_linkextractor(body);
    }, body);

    // Add an example HTML seed to the fuzz target
    target.seed(
        '<a href="https://example.com/nofollow.html#foo" rel="nofollow">Dont follow this one</a>'
    );

    // Make the fuzzer aware of the target
    f.addFuzzTarget(target);
}
Fuzzbuzz will automatically check all .ts files in your fuzz directory for fuzz tests, so we can use this to keep all of our fuzzing-specific code in one spot.
To make sure everything works as expected, run the fuzz command:
fuzzbuzz fuzz
Analyzing files...
✔ Found 3 fuzz tests
✔ Fuzzed FuzzBS for 20 seconds, Average tests/s: 11, Total corpus: 110, Total executions: 171
✔ Fuzzed FuzzLinkExtractor for 20 seconds, Average tests/s: 1564, Total corpus: 34, Total executions: 7821
✔ Fuzzed FuzzOAuth2Session for 20 seconds, Average tests/s: 1062, Total corpus: 12, Total executions: 10862
All functions checked. Ready to submit to Fuzzbuzz!
NOTE: one of these functions may produce an unhandled exception - this is expected, there are a couple left in here for the fuzzer to find.
You can run a single fuzz test continuously by providing its name as an argument:
fuzzbuzz fuzz FuzzOAuth2Session
Step 5: Log in to Fuzzbuzz
Head to https://beta.fuzzbuzz.io and log into your account. If you don't have a Fuzzbuzz account, you can request access here.
Step 6: Set up your Project
Fuzzbuzz integrates with your GitHub account to ensure it is always testing your latest changes. First, ensure the code and its fuzz tests is pushed up to a GitHub repository you control, and that it contains a fuzzbuzz.yaml at its root.
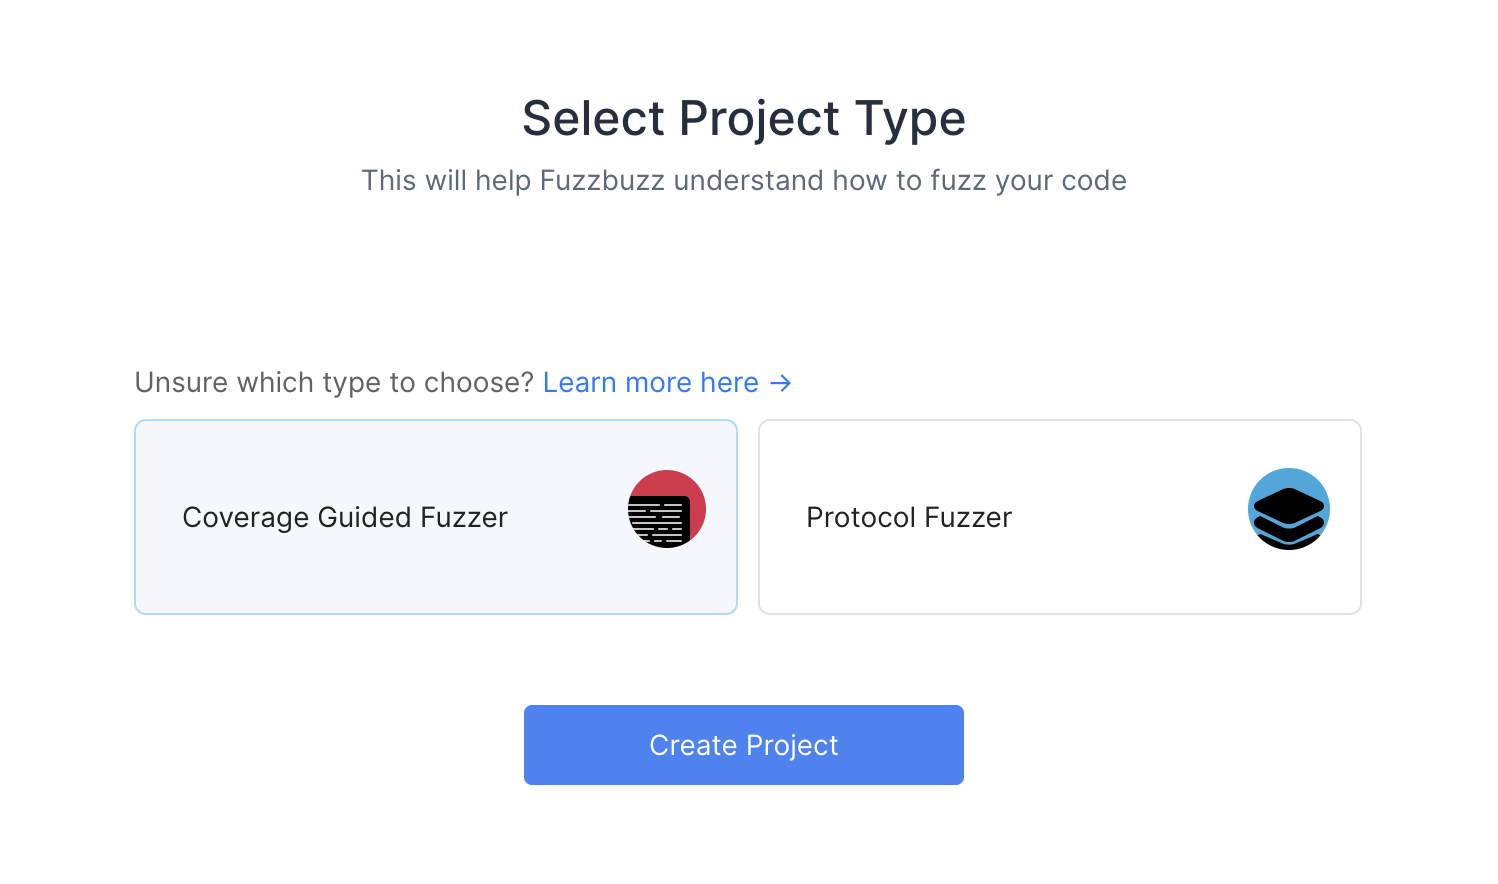
When you first log into Fuzzbuzz, you're presented with a blank homepage and an "Add New Project" button. Click this button, and select "Coverage Guided Fuzzer".
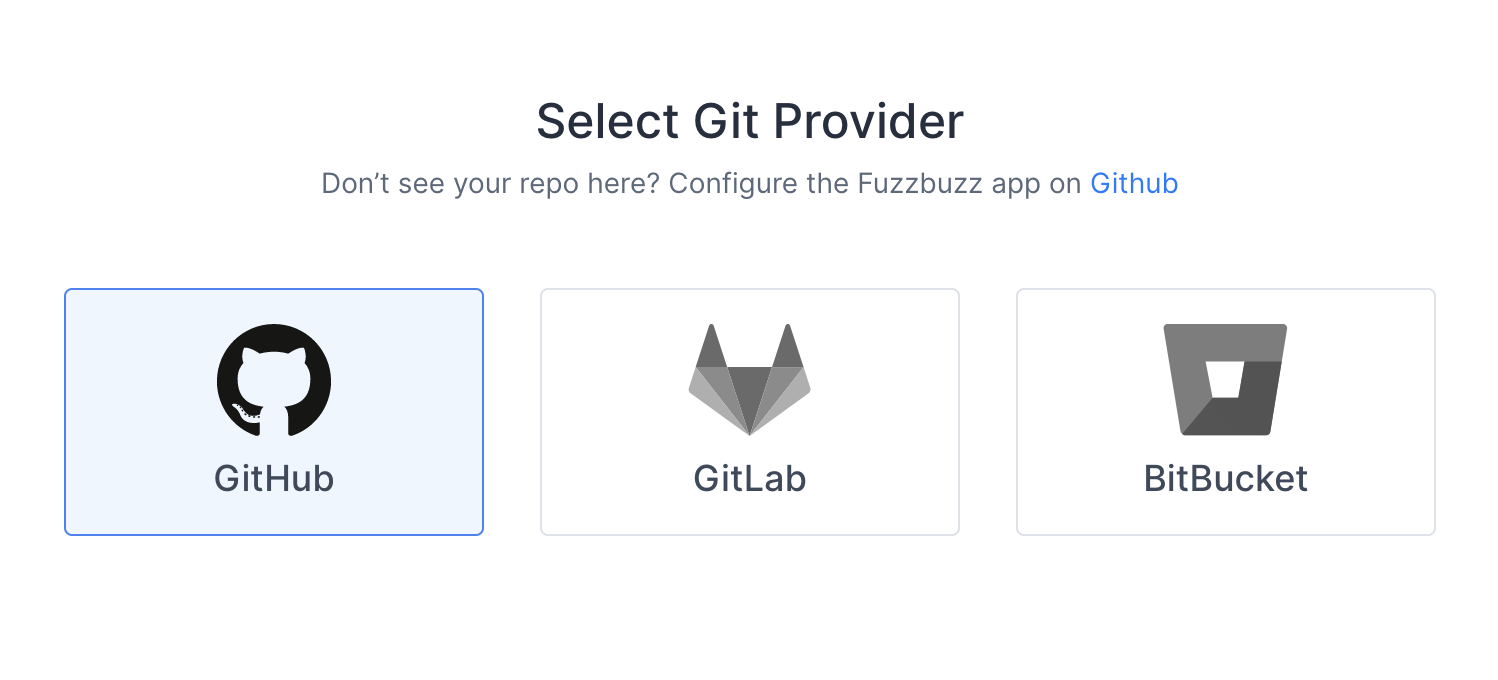
You'll then be presented with a Git Providers screen. Right now Fuzzbuzz supports GitHub, but GitLab and Bitbucket integrations are coming soon.
Select GitHub and press Next.
Finally, you will be redirected to GitHub to authorize the Fuzzbuzz app. This initial authorization is used to gather a list of the projects you have access to. You will then be asked to install the GitHub app on your organization or repository.
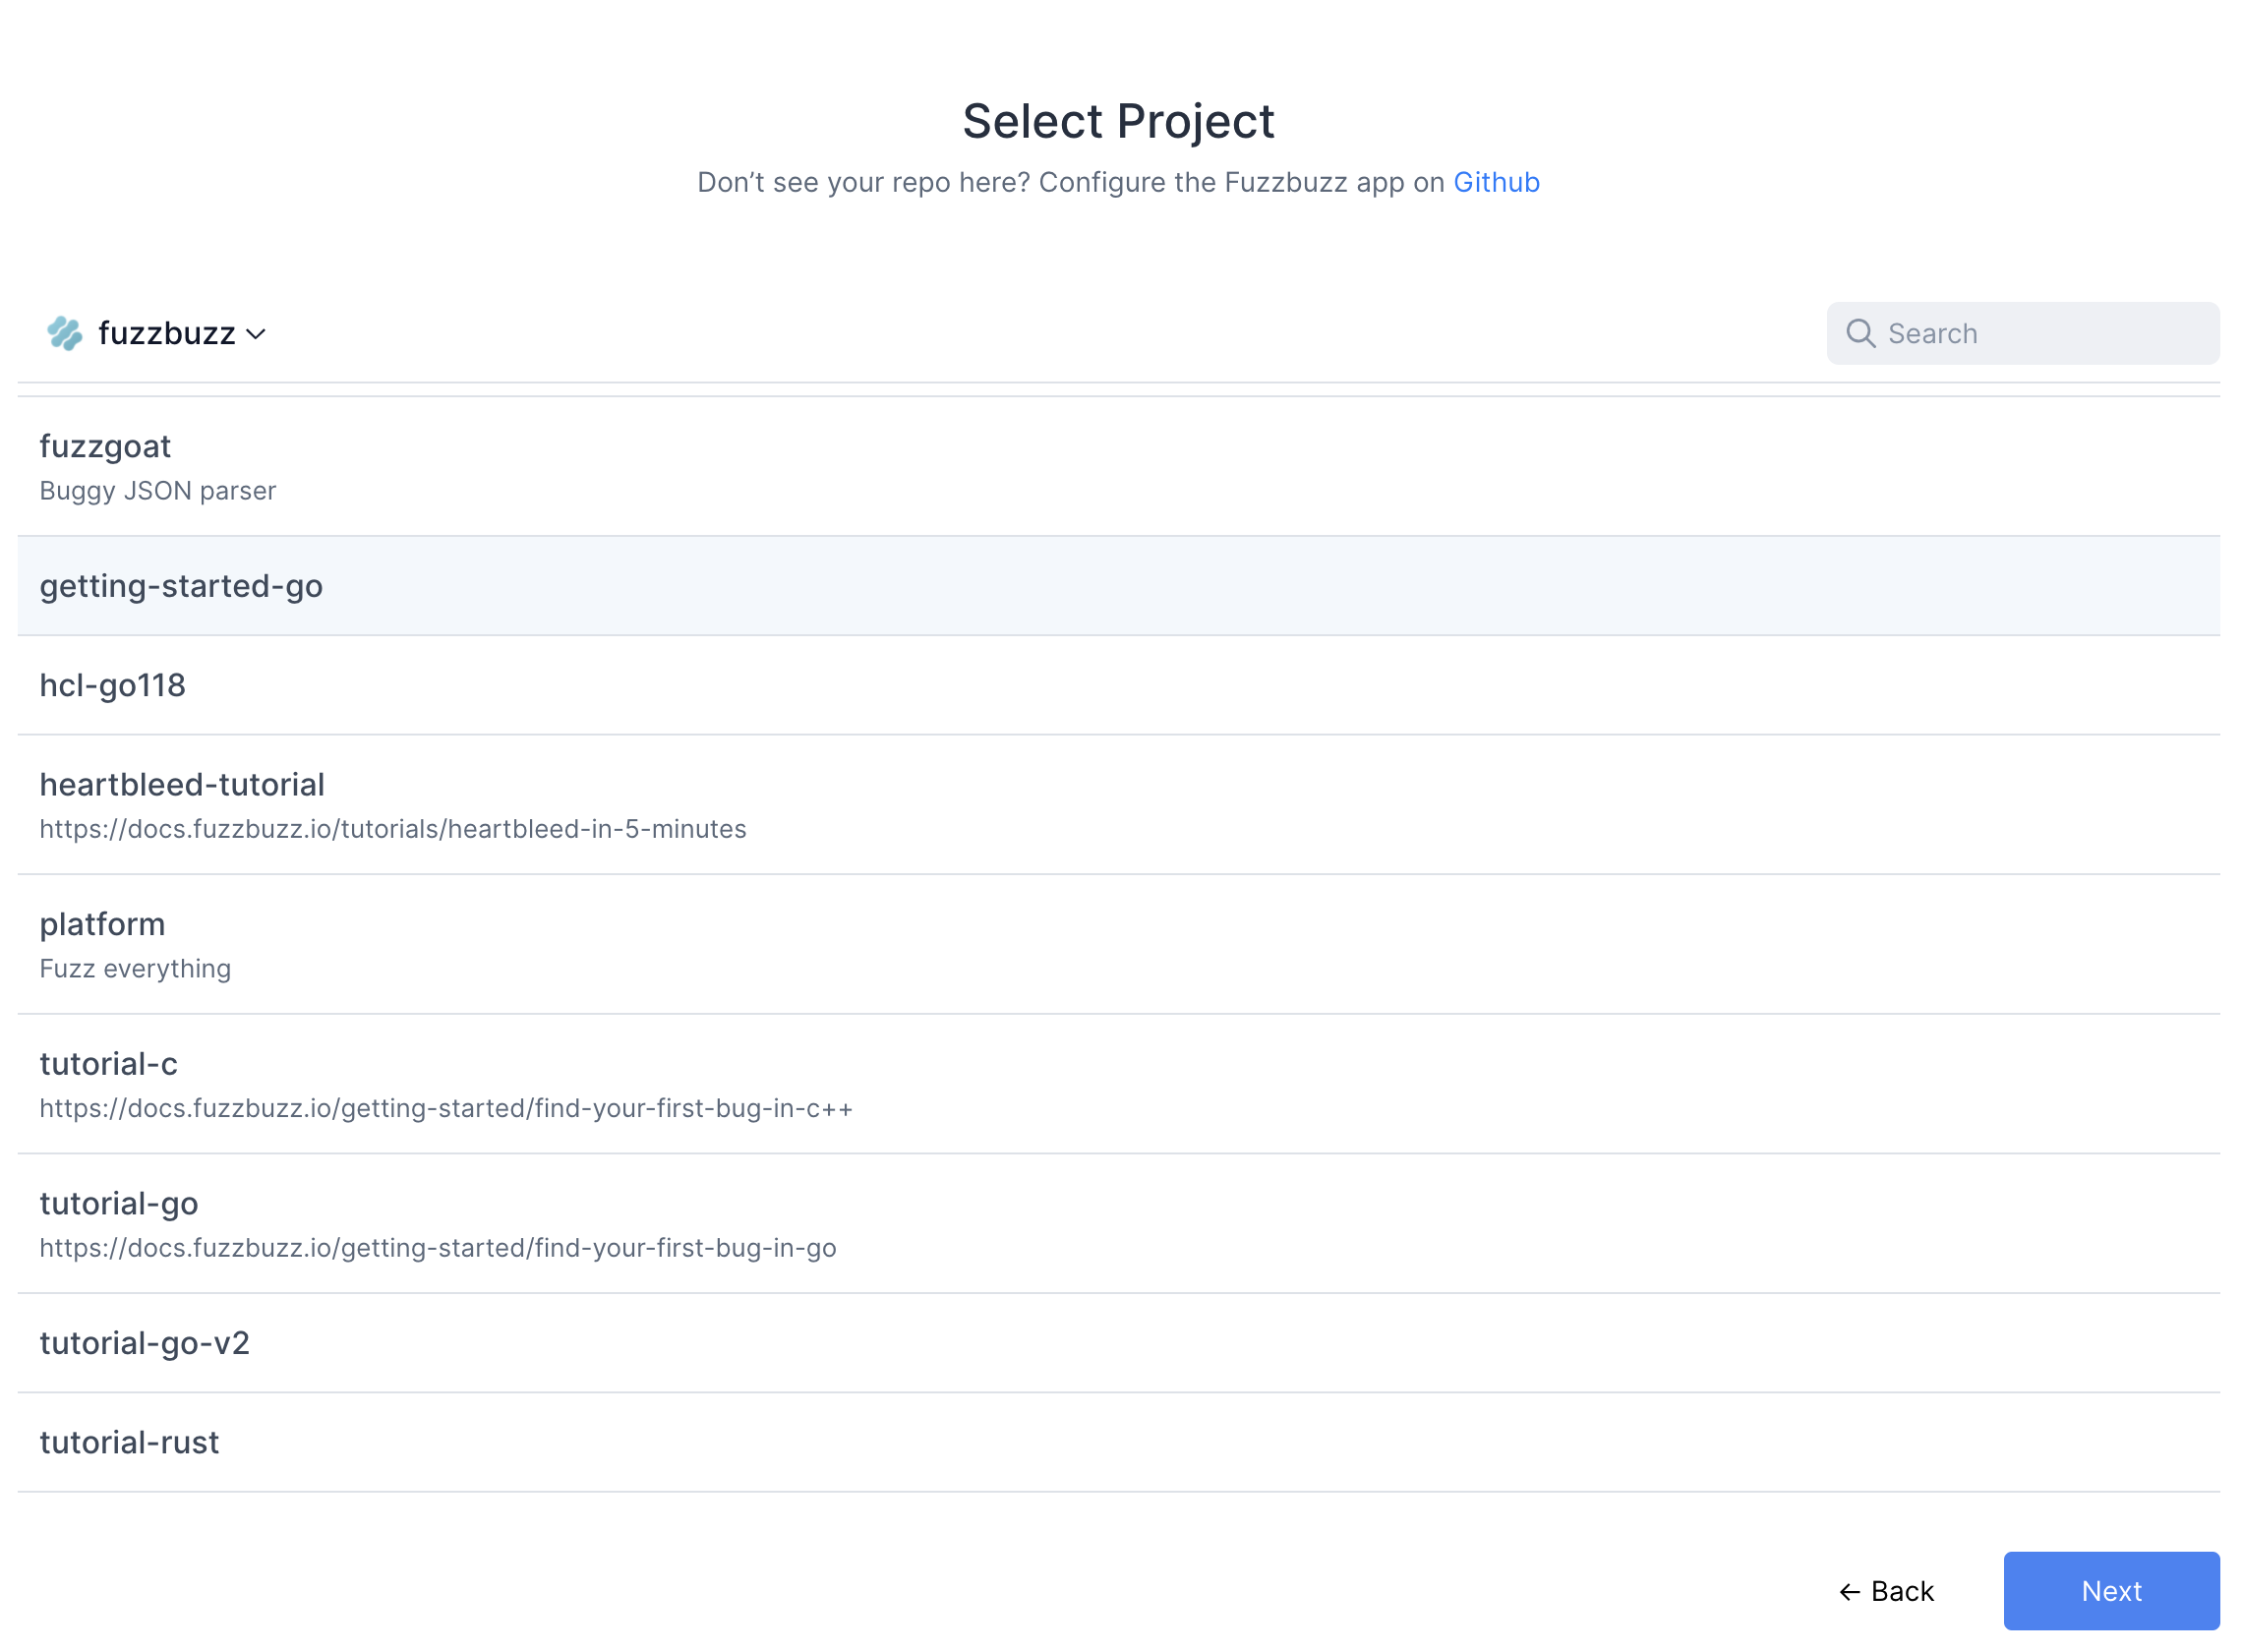
Once you're finished, select the project you wish to test.
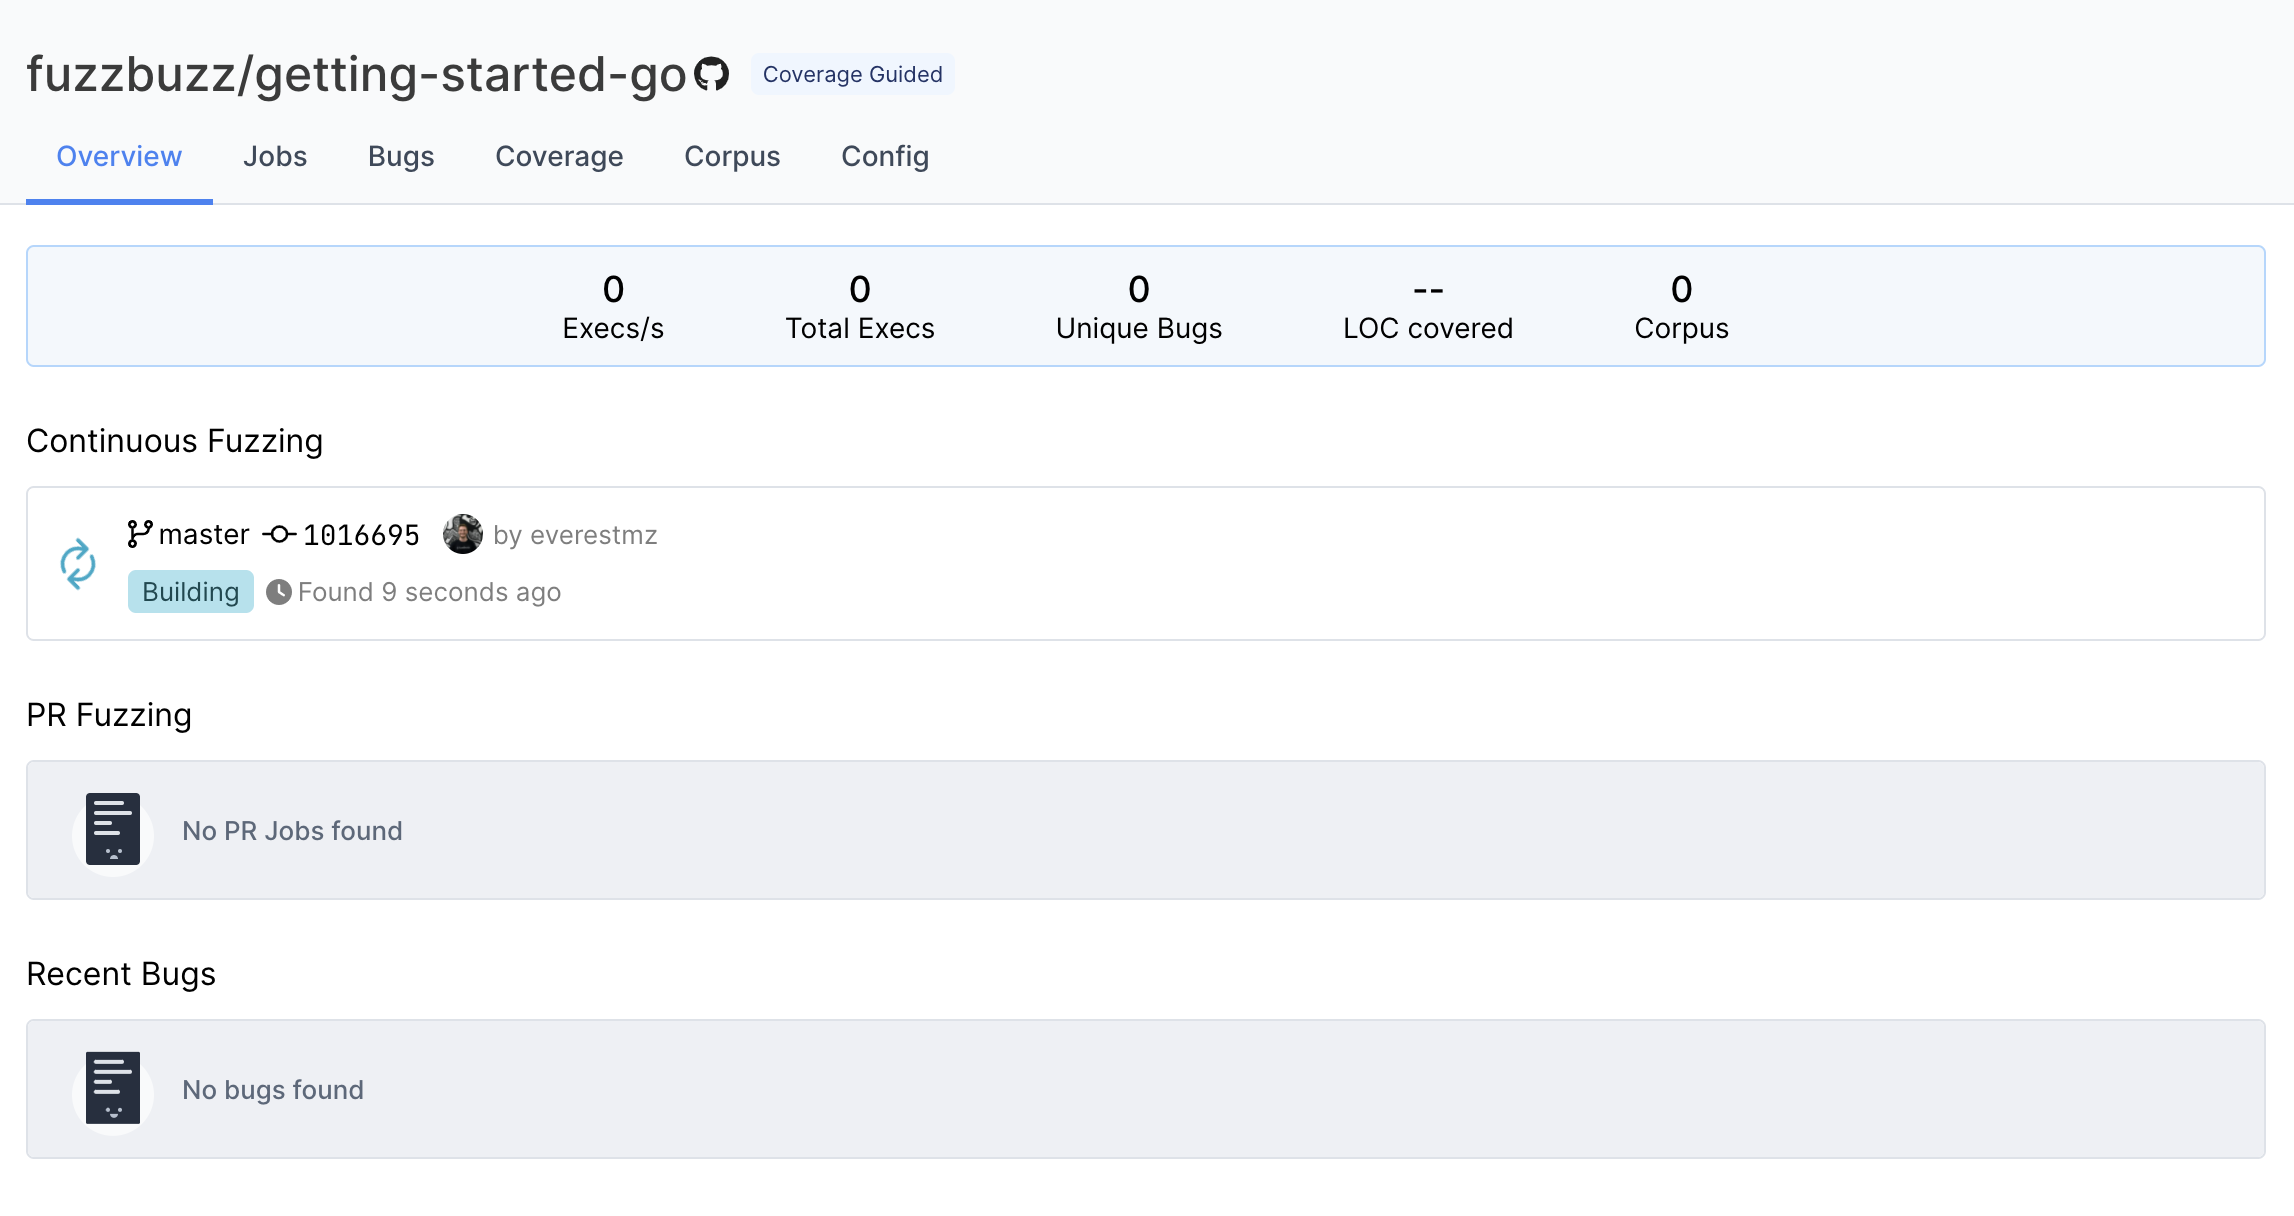
Fuzzbuzz will automatically detect your fuzzbuzz.yaml file, check it for any errors, and then begin building your code. You can click the job in the Overview page to watch the build logs as your fuzz tests are compiled.
Step 7: Finding Bugs
When the build finishes, Fuzzbuzz will automatically detect any fuzz tests in your code, distribute them onto a cluster of CPUS, and begin testing them. Once your fuzz test has started running, you will see some general statistics about the progress the fuzzer is making, and after a few seconds you should see a bug appear. Congratulations - you've just found your first bug with Fuzzbuzz!
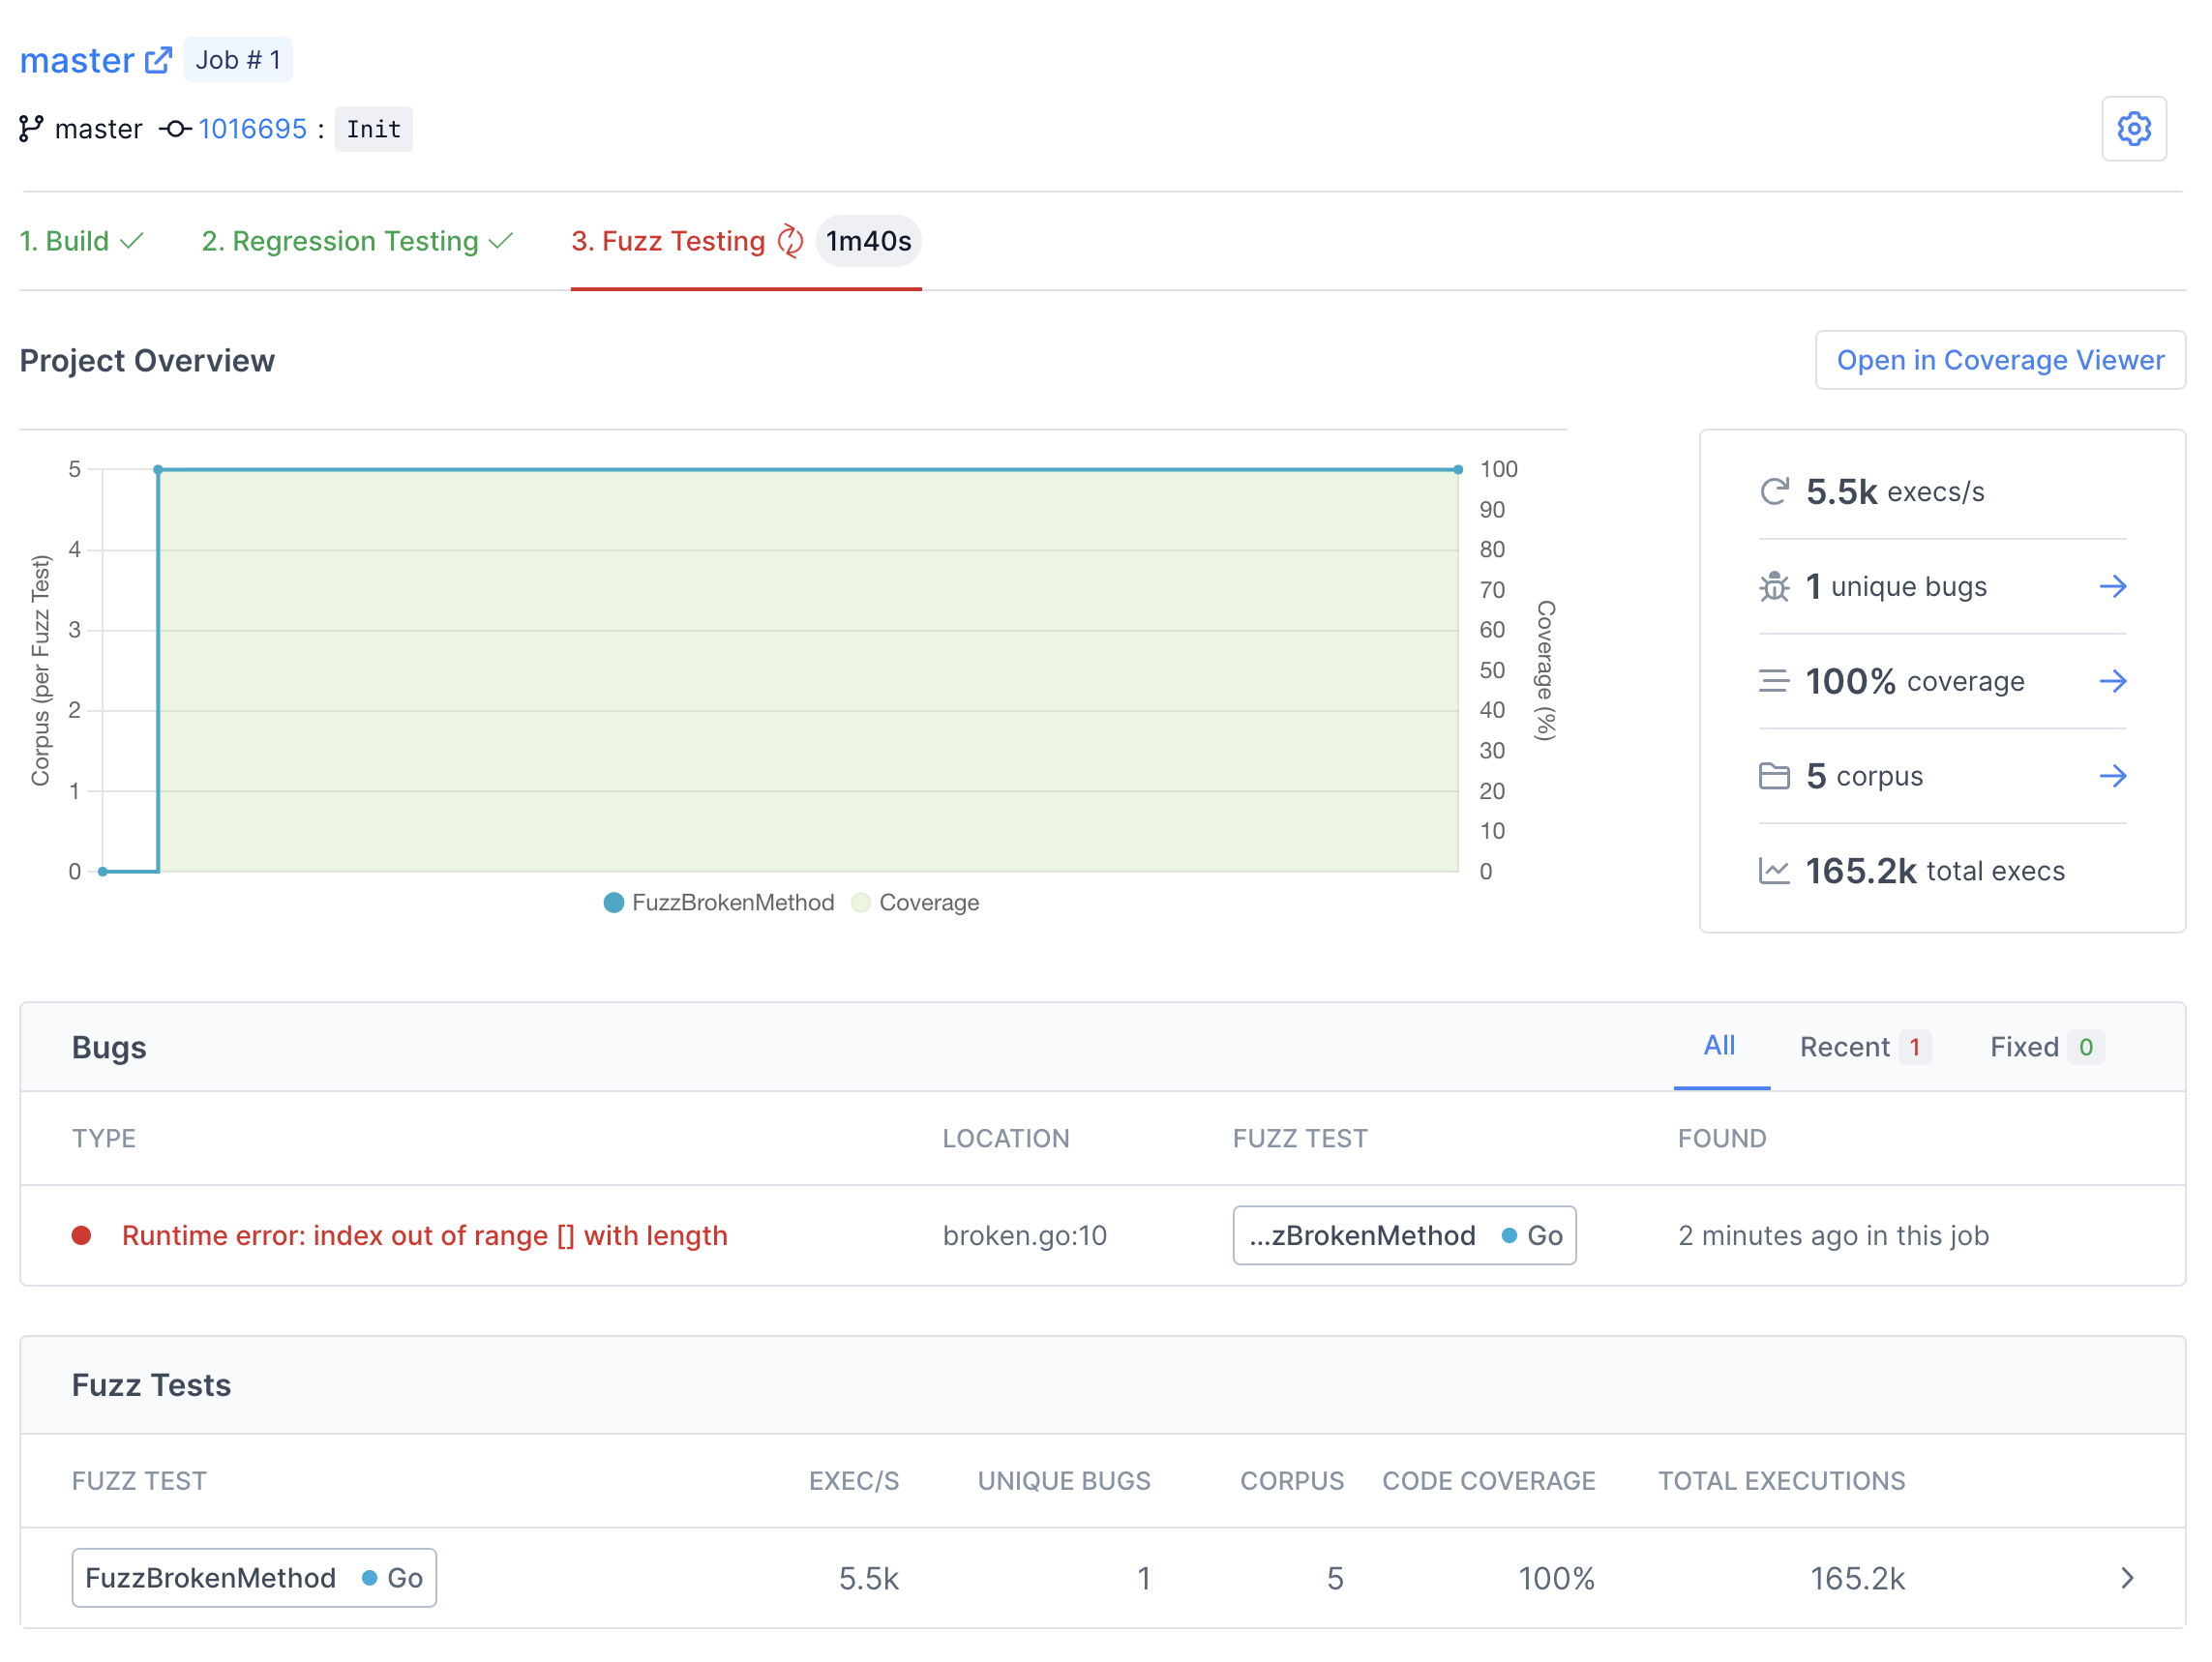
There are many details and features that we'll be skipping over in this tutorial. For more information about the capabilites and features of Fuzzbuzz, head over to the platform overview.
Click on the bug to view more details.
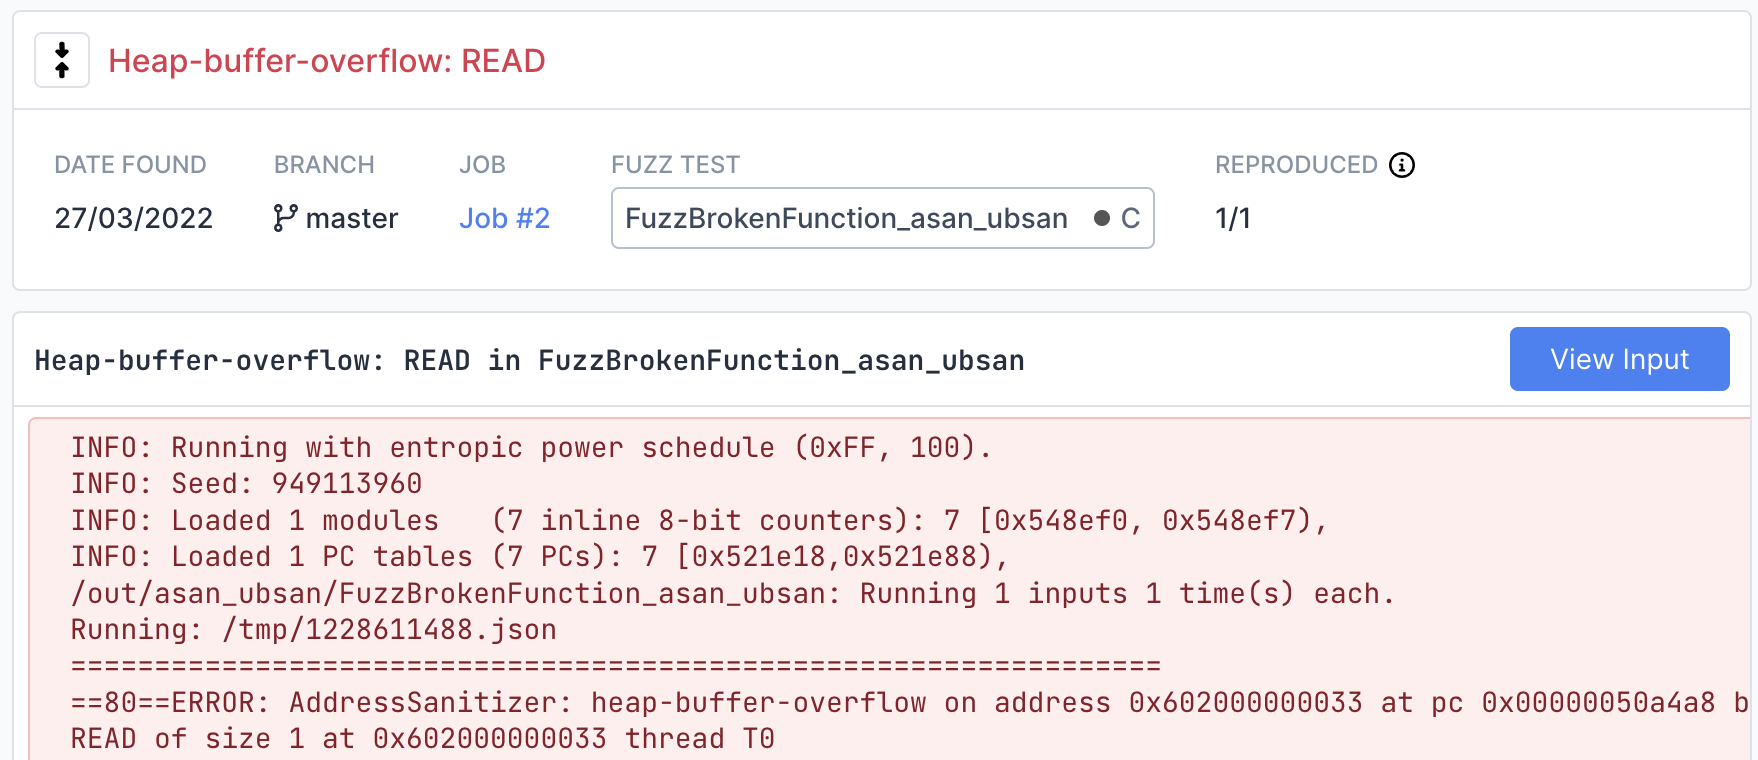
On this page you can find detailed information about the bug, including a stacktrace showing the exact line of code where the bug was encountered.
View the exact input that caused the bug by clicking the "View Input" button in the top right. If the fuzzer you are using is structured or supports multiple input values, this page will display each input separately in a structured viewer for easy inspection.
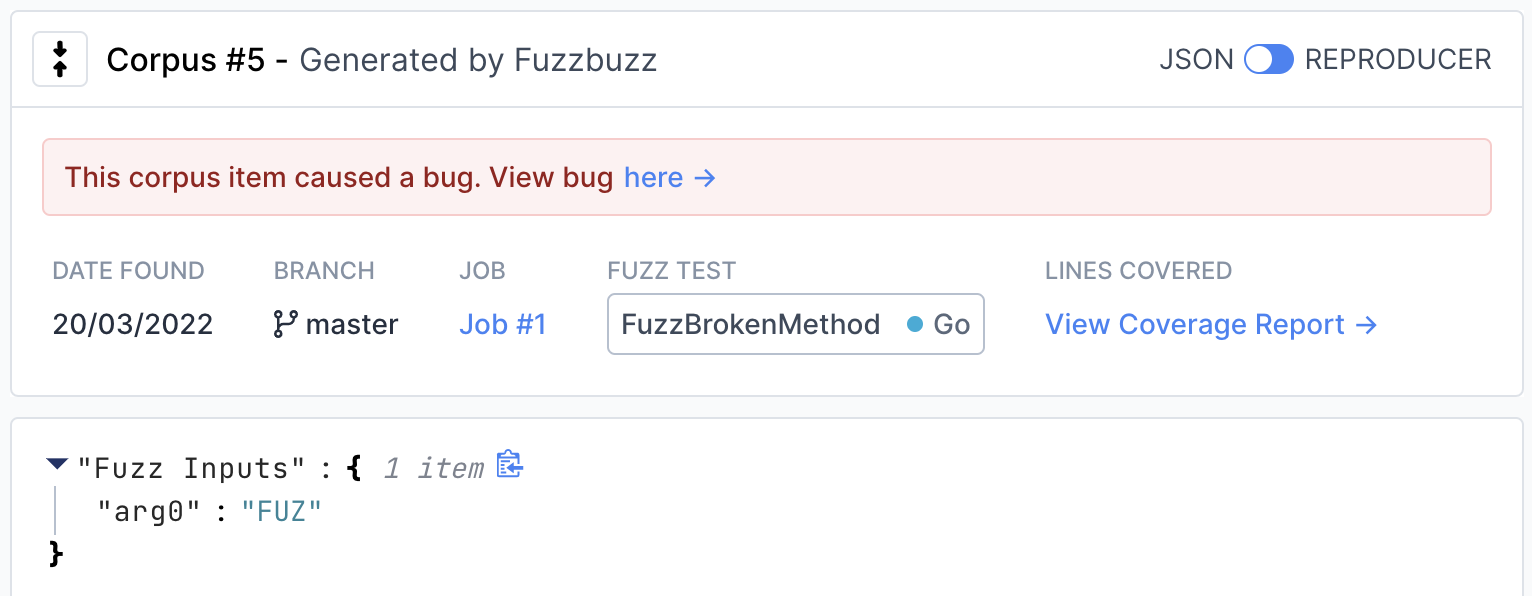
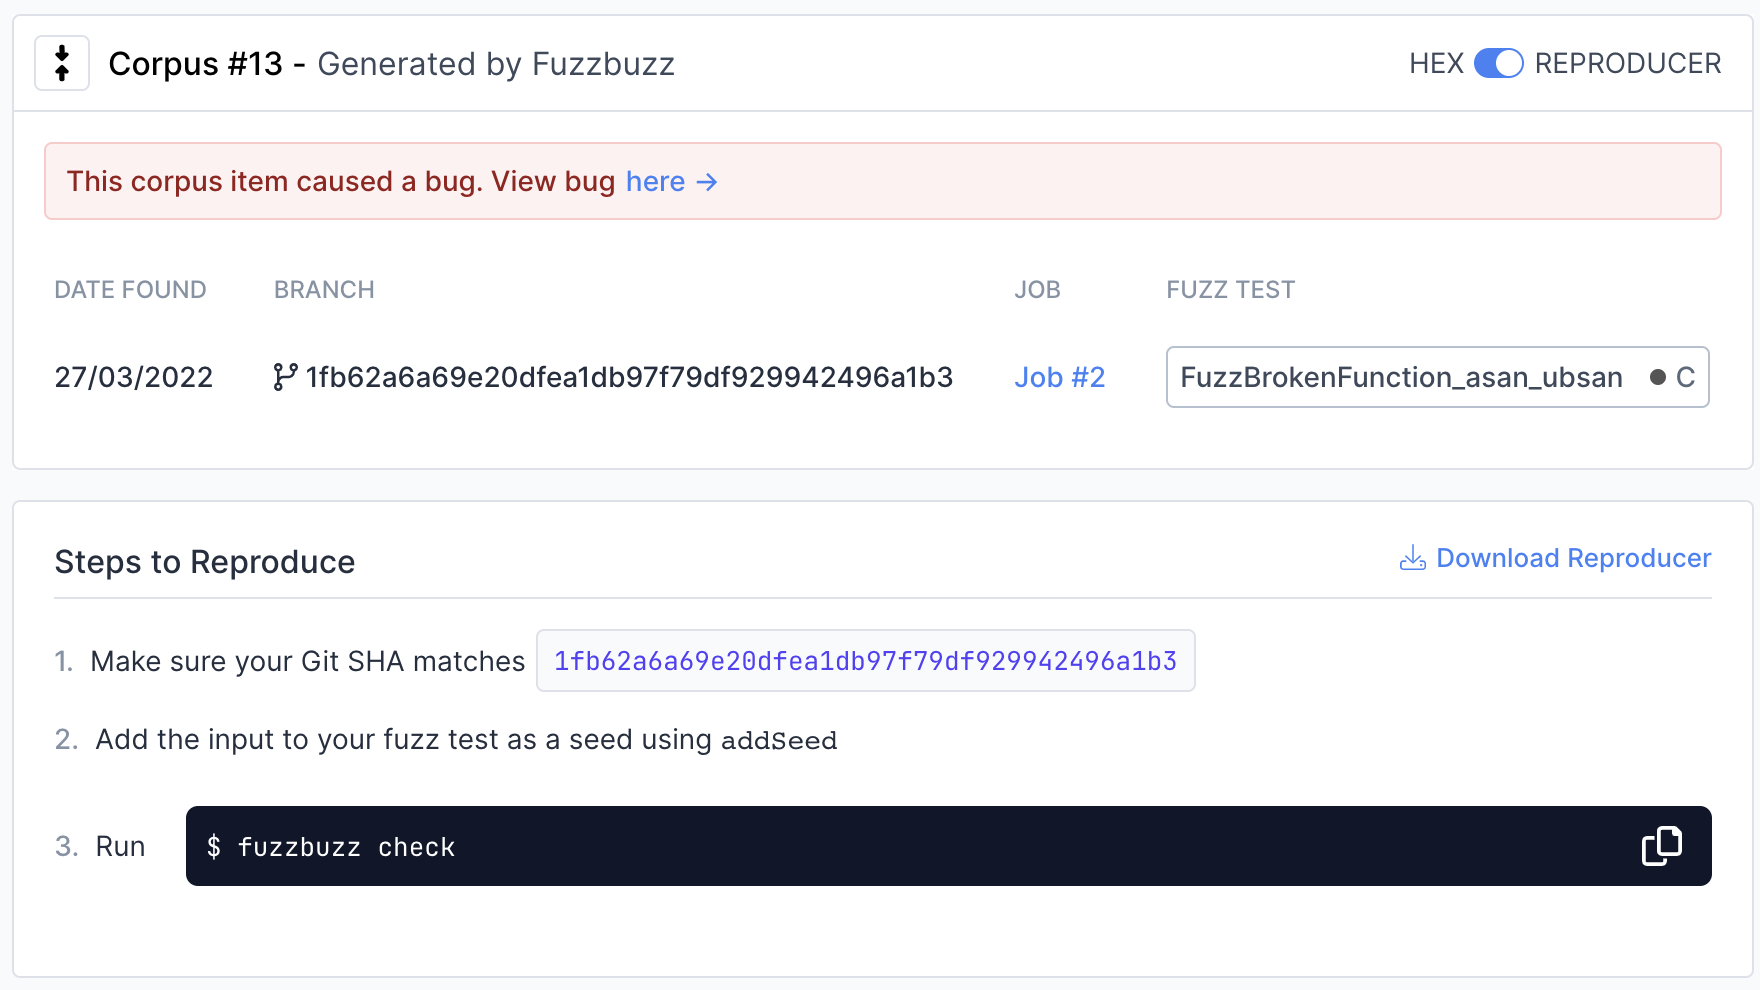
To view instructions on how to reproduce the input locally, move the switch in the top right from "JSON" to "Reproducer".
Step 8: Next steps
You've learned the basics of how to set up fuzz tests on Fuzzbuzz! Consider checking out our Platform Overview for a more in-depth look at all the features Fuzzbuzz has to offer, like our code coverage viewer and integrations.