Platform Overview
Fuzzing Terminology
Install the Fuzzbuzz CLI
Find your first C/C++ bug
Find your first Python bug
Find your first Rust bug
Find your first Go bug
Protocol Fuzzing
Seeding your fuzzer
Integrating with libFuzzer
Heartbleed in 5 Minutes
GitHub Integration
GitLab Integration
CLI Integration
fuzzbuzz.yaml reference
Fuzzer Reference
Bug Types
Self-Hosted Fuzzbuzz
Overview
Getting Started
Guides
Tutorials
Integrations
Reference
Heartbleed in 5 Minutes
This tutorial will walk you through how you can use Fuzzbuzz to find Heartbleed in OpenSSL 1.0.1f.
Step 1: Get the code
First, download a vulnerable version of OpenSSL to your machine:
curl -O https://ftp.openssl.org/source/old/1.0.1/openssl-1.0.1f.tar.gz
Then, uncompress it:
tar -xf ./openssl-1.0.1f.tar.gz
Step 2: Set up Fuzzbuzz
Enter the openssl-1.0.1f directory, and run:
fuzzbuzz init
Choose C for the language you wish to fuzz, select "no" for whether you have existing fuzz tests, and then type ./config and make for the commands used to compile the code. When the setup is complete, your fuzzbuzz.yaml should look similar to this:
cat fuzzbuzz.yaml
openssl:
  language: c
  steps:
    - run: ./config
    - run: make
Run fuzzbuzz build, and watch OpenSSL build. In the background, Fuzzbuzz will watch the compilation of OpenSSL, instrument the code for fuzzing, and collect information about your compile that will allow it to build fuzz tests.
Step 3: Add a fuzz test
Add the following fuzz test in fuzz/fuzz_handshake.cxx:
#include <openssl/ssl.h>
#include <openssl/err.h>
#include <assert.h>
#include <stdint.h>
#include <stddef.h>

#include "fuzzbuzz.hxx"

SSL_CTX *Init() {
    SSL_library_init();
    SSL_load_error_strings();
    ERR_load_BIO_strings();
    OpenSSL_add_all_algorithms();
    SSL_CTX *sctx;
    assert (sctx = SSL_CTX_new(TLSv1_method()));
    /* These two file were created with this command:
    openssl req -x509 -newkey rsa:512 -keyout server.key \
    -out server.pem -days 9999 -nodes -subj /CN=a/
    */
    assert(SSL_CTX_use_certificate_file(sctx, "runtime/server.pem", SSL_FILETYPE_PEM));
    assert(SSL_CTX_use_PrivateKey_file(sctx, "runtime/server.key", SSL_FILETYPE_PEM));
    return sctx;
}

FZBZ_TARGET_CLASS(FuzzHandshake);
struct FuzzHandshake {
    FuzzHandshake(fzbz::Fuzzer &f) {
        auto gen = fzbz::generator::byteArray<std::vector<uint8_t>>();

        auto target = fzbz::fuzzTarget([&](auto Data) {
              static SSL_CTX *sctx = Init();
              SSL *server = SSL_new(sctx);
              BIO *sinbio = BIO_new(BIO_s_mem());
              BIO *soutbio = BIO_new(BIO_s_mem());
              SSL_set_bio(server, sinbio, soutbio);
              SSL_set_accept_state(server);
              BIO_write(sinbio, Data.data(), Data.size());
              SSL_do_handshake(server);
              SSL_free(server);
              return 0;
        }, gen);

        f.addFuzzTarget(target);
    }
};
This sets up a fuzz test that initializes OpenSSL, and then uses data from a Byte Array generator to make a handshake.
The test also uses some example key files. To generate these, run:
cd fuzz && openssl req -x509 -newkey rsa:512 -keyout server.key -out server.pem -days 9999 -nodes -subj /CN=a/
To check that this test is set up correctly, run:
fuzzbuzz check
Analyzing files...
✔ Analyzed 133 files
Found fuzz directory, building tests...
✔ Built 1 fuzz tests

Checking fuzz tests...
✔ Ran 57.3k tests on FuzzHandshake in 20 seconds
All functions checked. Ready to submit to Fuzzbuzz!
Step 4: Add project to Fuzzbuzz
Fuzzbuzz integrates with your GitHub account to ensure it is always testing your latest changes. The simplest way to test the Heartbleed repository on your own account is to fork it. If you wish to push your own repository, be sure to include the fuzzbuzz.yaml and all fuzz tests.
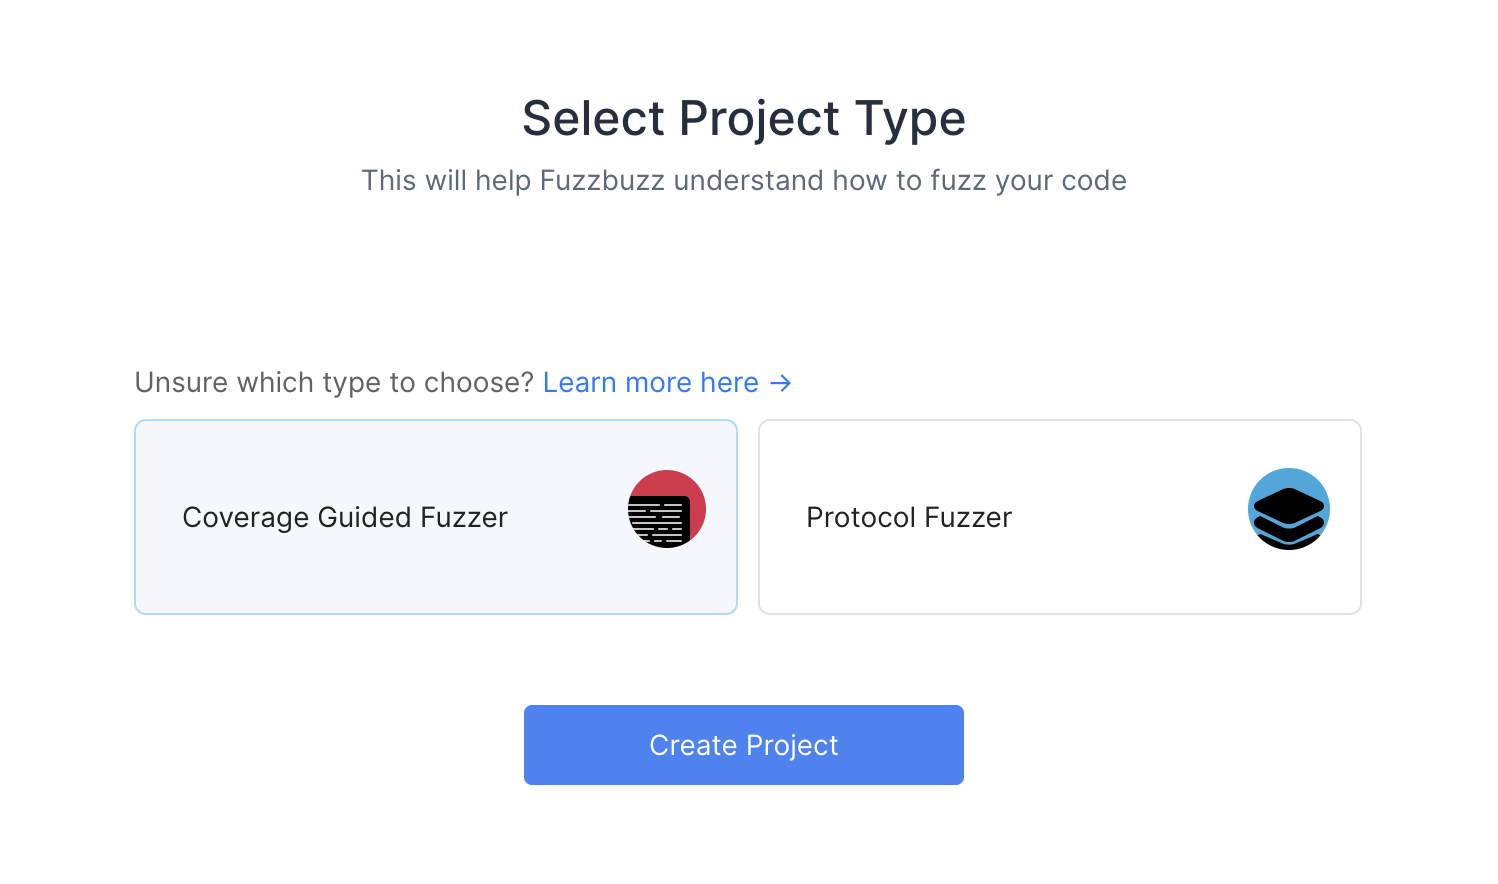
When you first log into Fuzzbuzz, you're presented with a blank homepage and an "Add New Project" button. Click this button, and select "Coverage Guided Fuzzer".
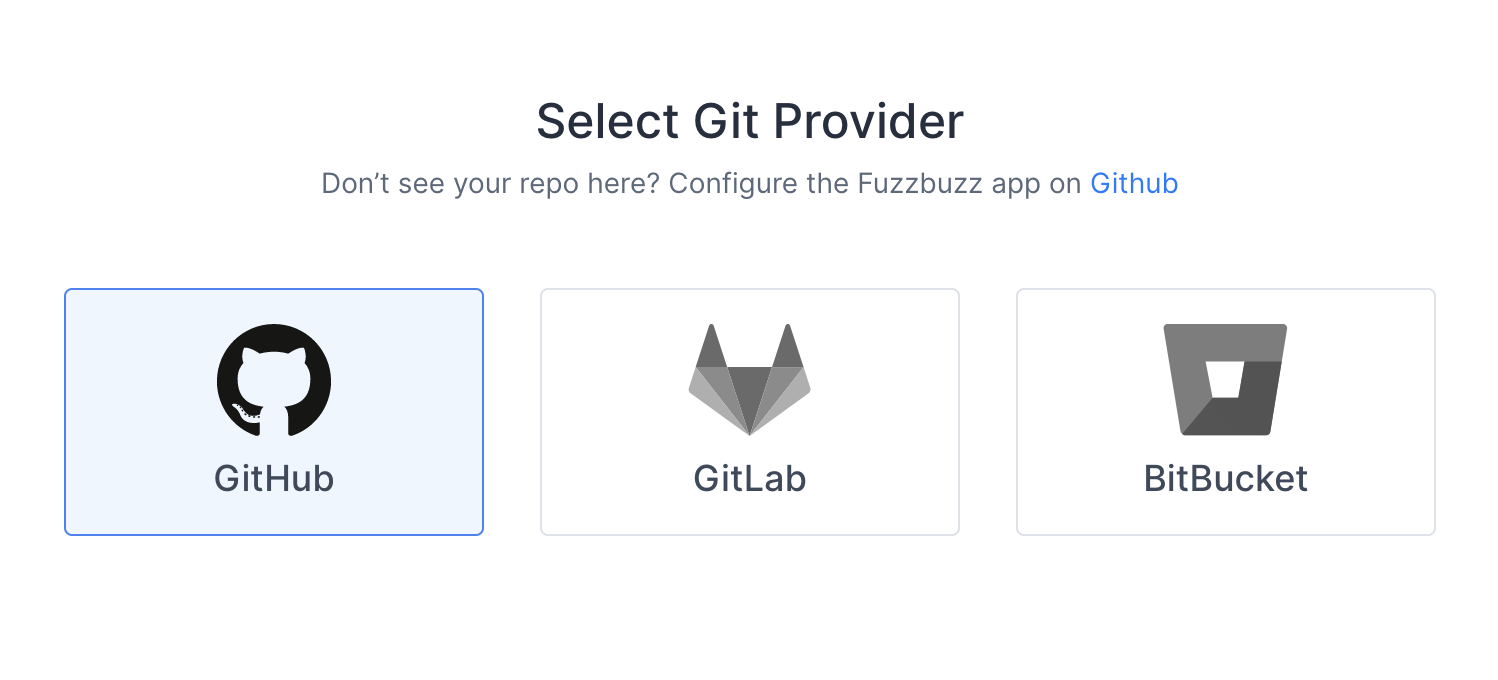
You'll then be presented with a Git Providers screen. Right now Fuzzbuzz supports GitHub, but GitLab and Bitbucket integrations are coming soon.
Select GitHub and press Next.
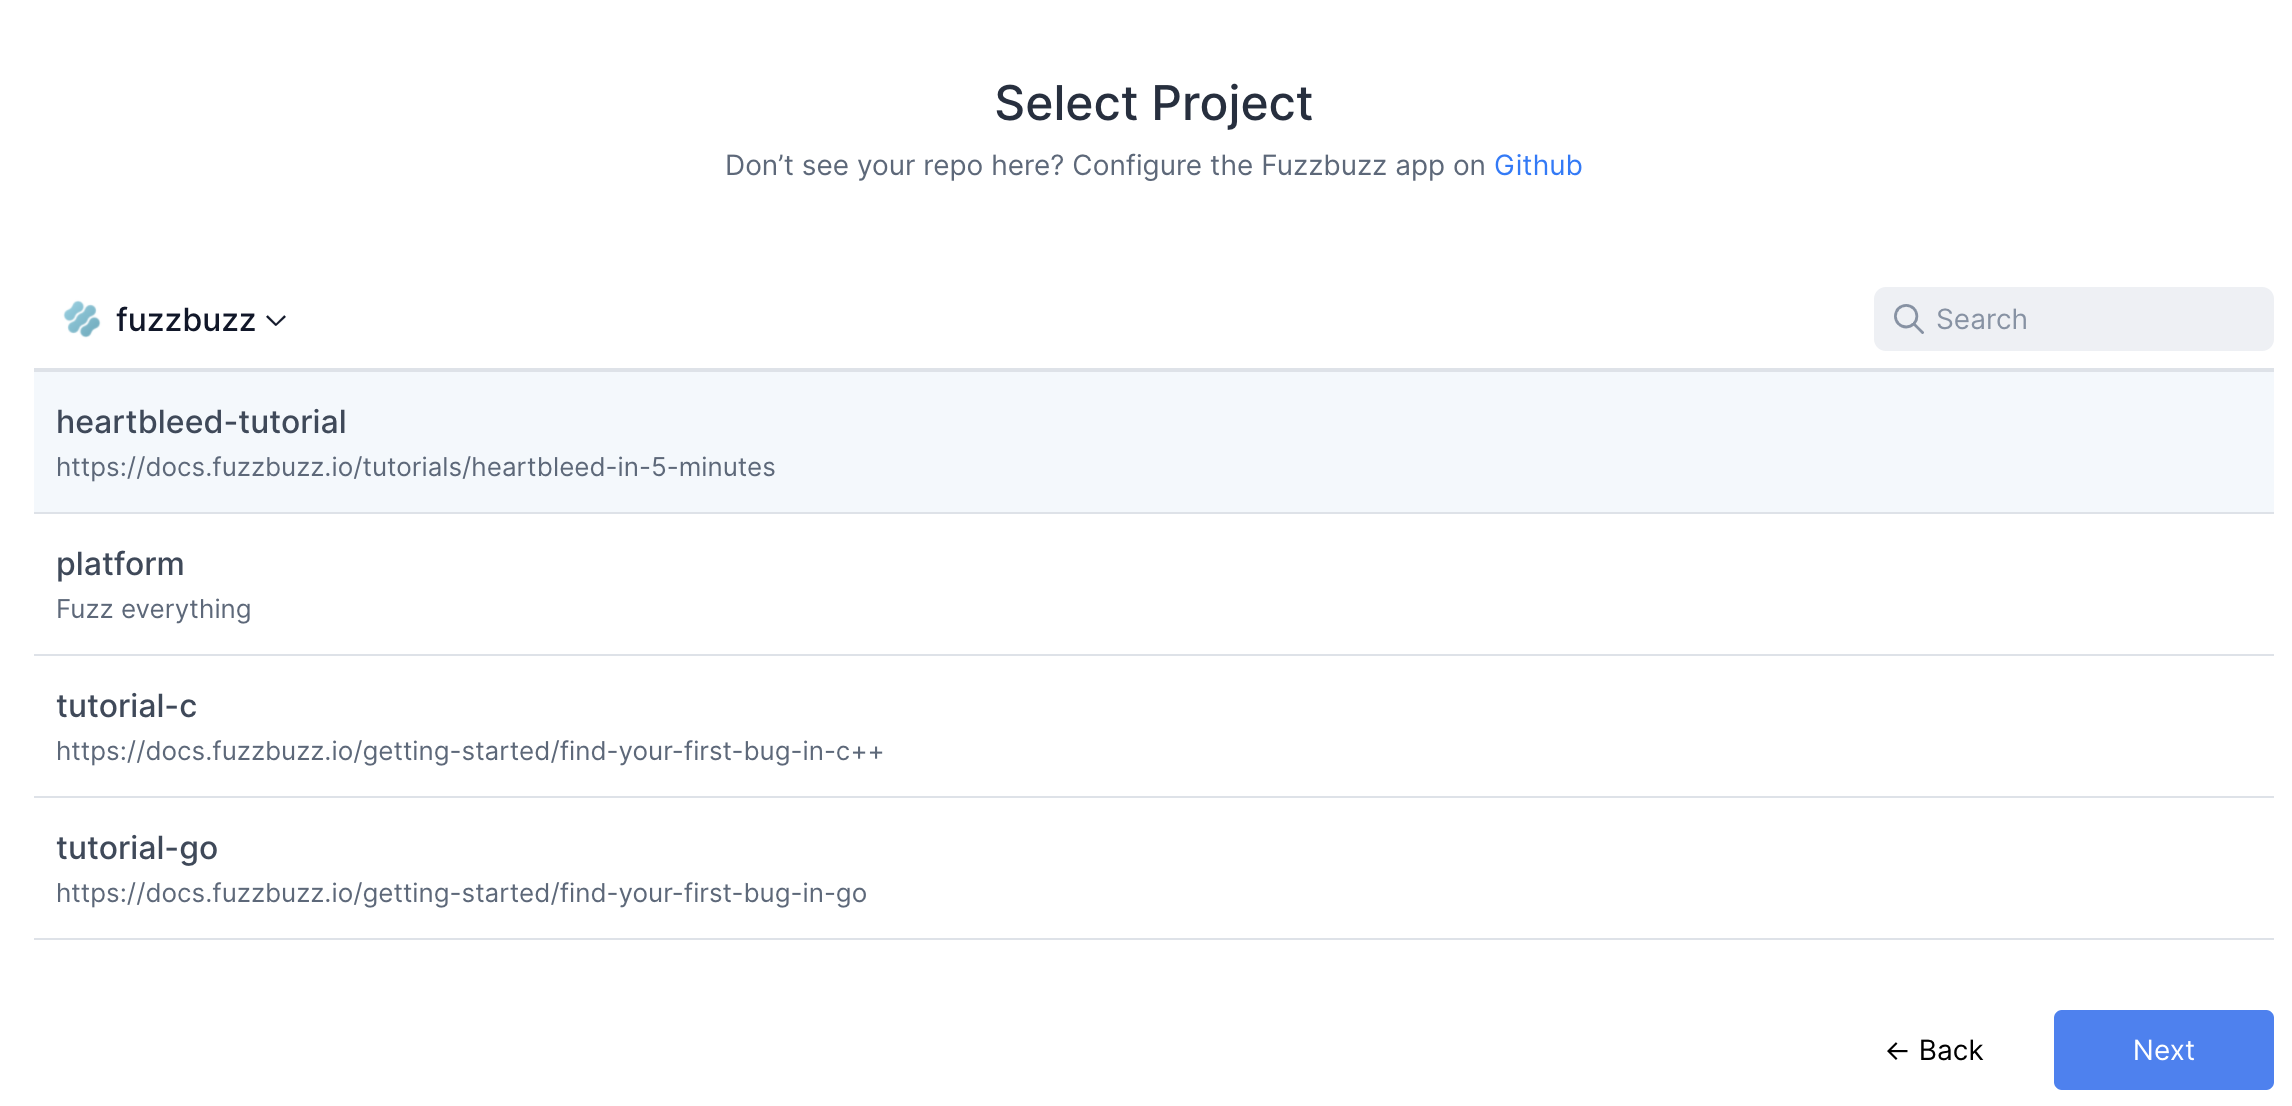
Finally, you will be redirected to GitHub to authorize the Fuzzbuzz app. This initial authorization is used to gather a list of the projects you have access to. You will then be asked to install the GitHub app on your organization or repository.
Once you're finished, select the project you wish to test.
Fuzzbuzz will automatically detect your fuzzbuzz.yaml file, check it for any errors, and then begin building your code. You can click the job in the Overview page to watch the build logs as your fuzz tests are compiled.

Step 5: Find Heartbleed!
A few minutes after the target begins fuzzing, you should see an entry pop up in the list of bugs. Congratulations - you've just found Heartbleed with Fuzzbuzz.
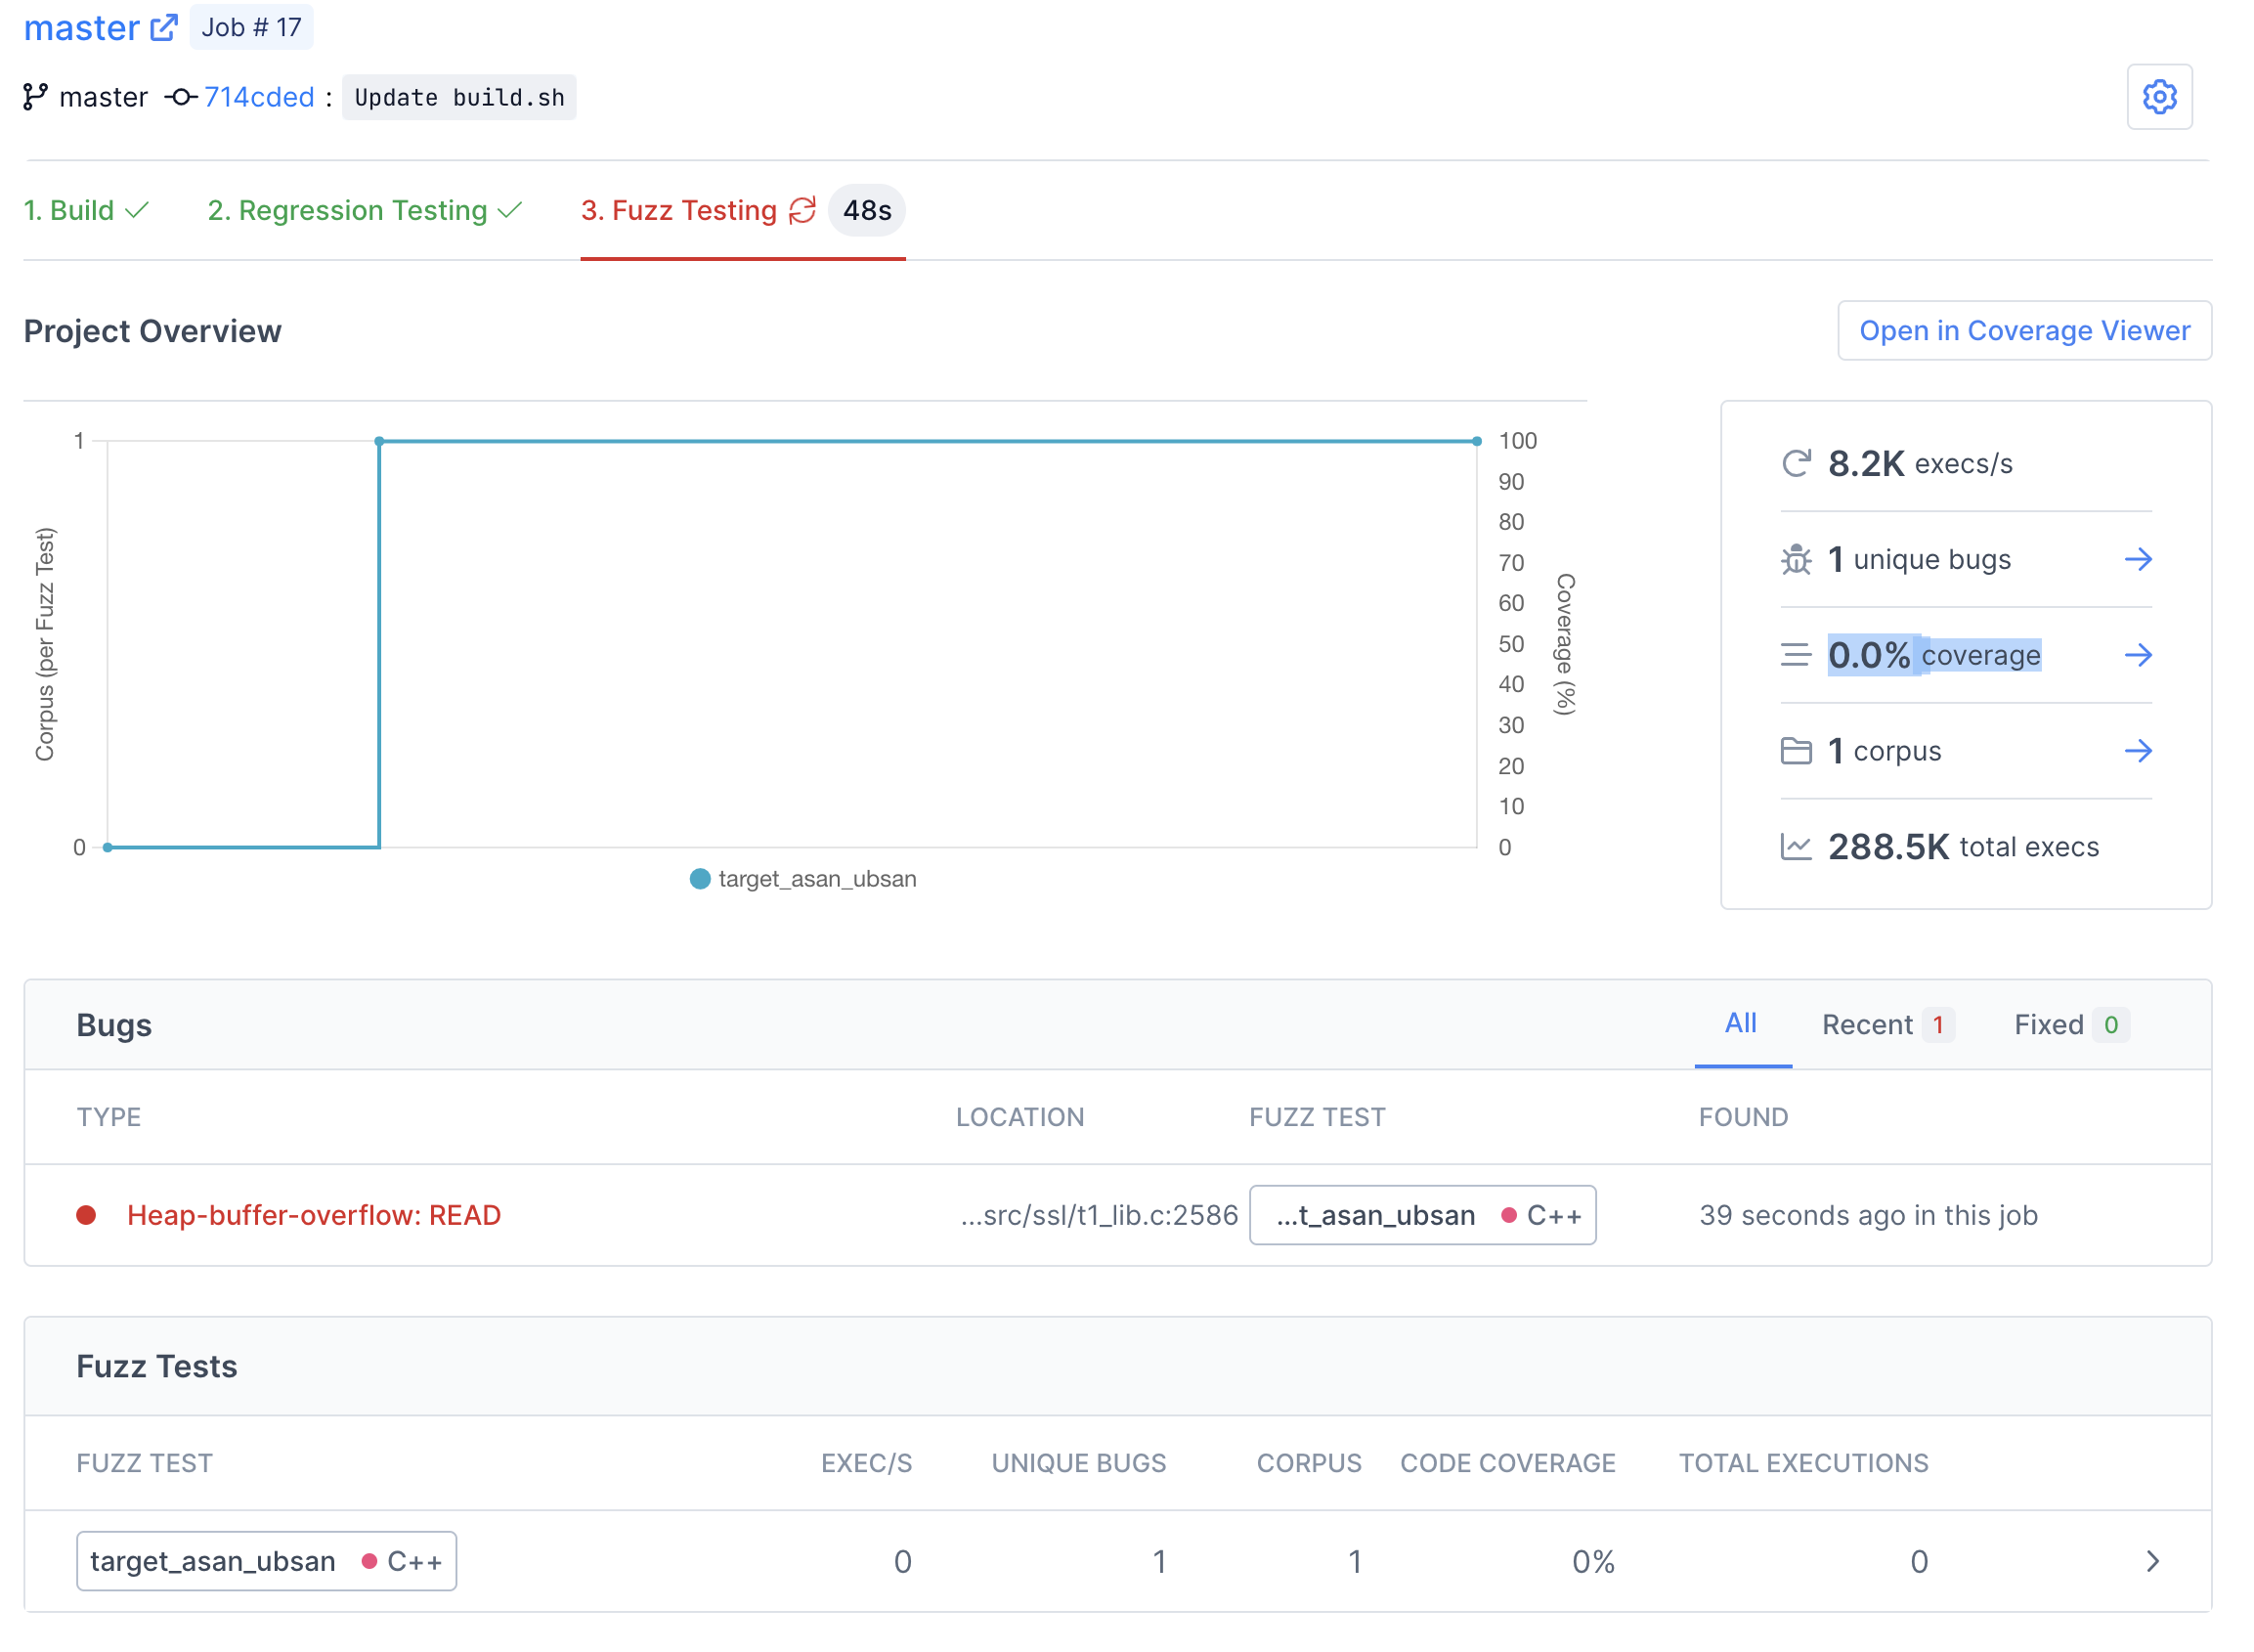
For more information about the bug, click the red bug type in the Bugs table to go to the bug details view. Here you can see the stacktrace and the exact line the bug was found on. According to the stacktrace, it's a Heap-buffer-overflow - more specifically a Read of size 65470.
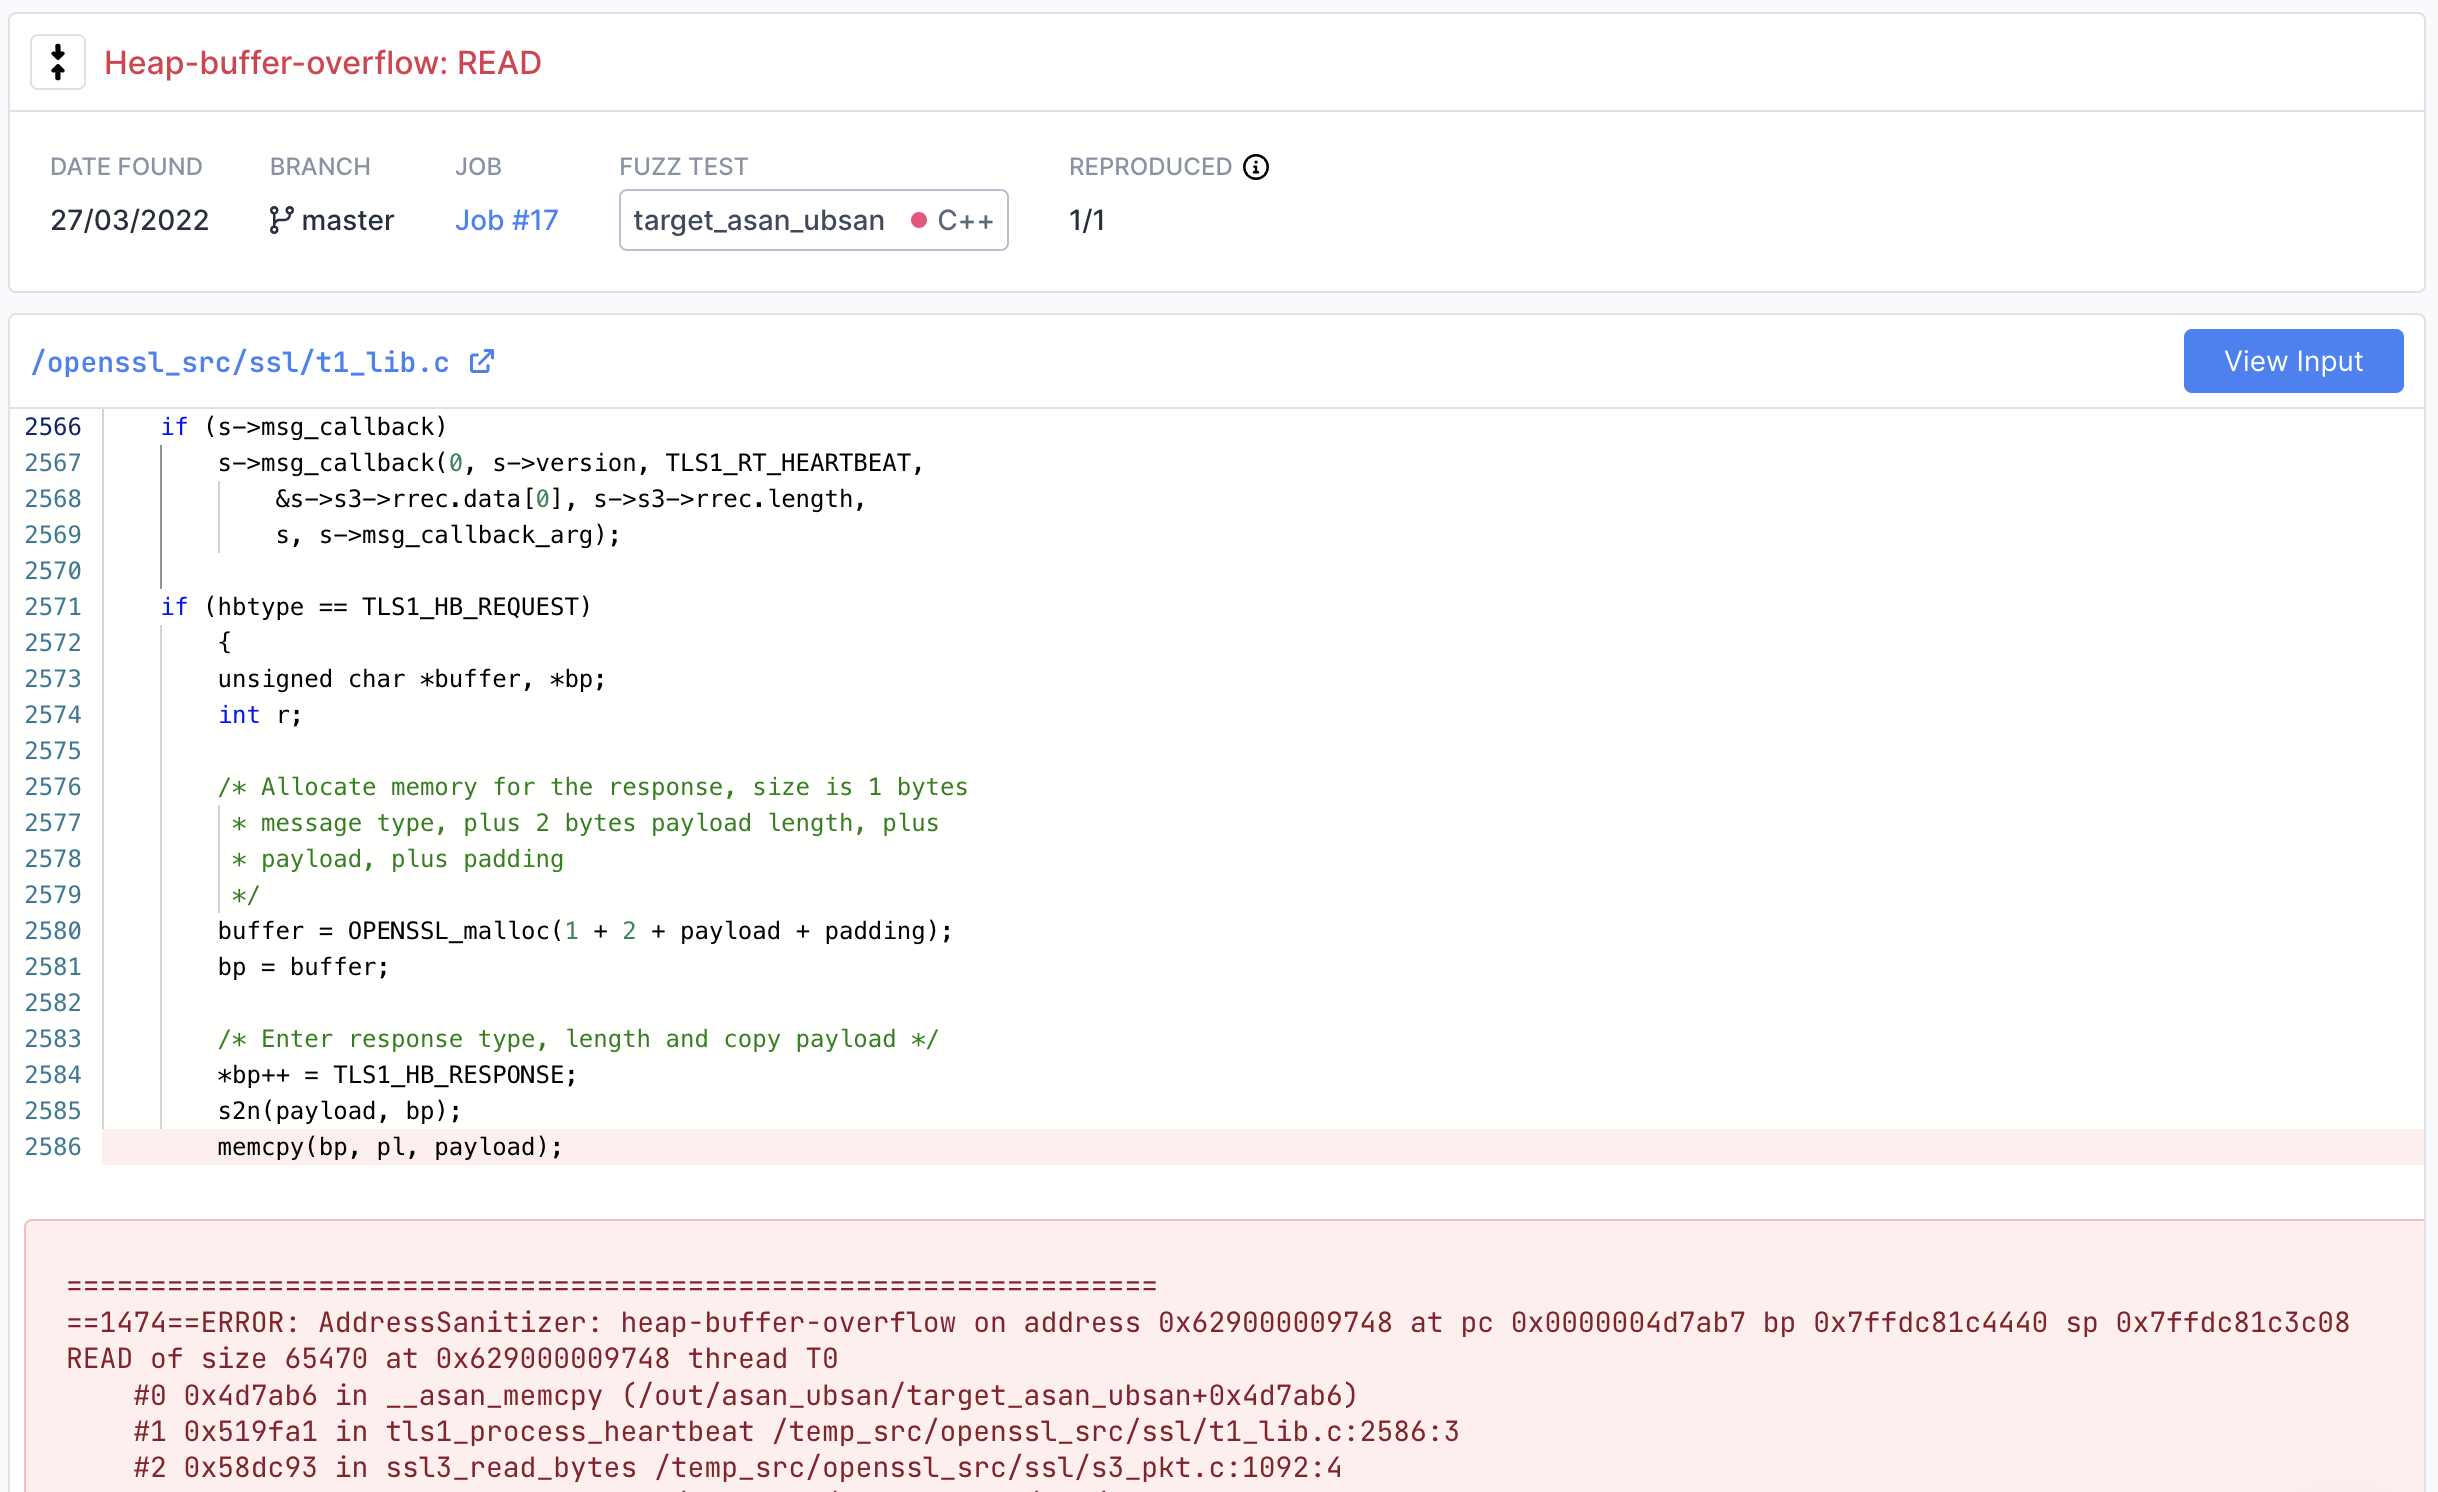
Congratulations, you've found heartbleed by fuzzing!