Platform Overview
Fuzzing Terminology
Install the Fuzzbuzz CLI
Find your first C/C++ bug
Find your first Python bug
Find your first Rust bug
Find your first Go bug
Protocol Fuzzing
Seeding your fuzzer
Integrating with libFuzzer
Heartbleed in 5 Minutes
GitHub Integration
GitLab Integration
CLI Integration
fuzzbuzz.yaml reference
Fuzzer Reference
Bug Types
Self-Hosted Fuzzbuzz
Overview
Getting Started
Guides
Tutorials
Integrations
Reference
Find your first bug in C or C++
This Getting Started guide will walk you through an end-to-end demo of the Fuzzbuzz platform, from setting up a project all the way to finding and fixing a bug.
Step 1: Get the code
First, clone the tutorial code to your machine:
git clone https://github.com/fuzzbuzz/getting-started-c
Step 2: Code Review
This repository consists of a very basic C project with a header file broken.h, a function in broken.c, and a Makefile that compiles these files into an archive. The concepts introduced in this tutorial will work for a variety of common build system tools for C or C++ like CMake or Bazel.
Take a look at broken.c:
#include <stdint.h>
#include <stddef.h>

int BrokenFunction(const uint8_t * Data, size_t Size) {
  return Size >= 3 &&
      Data[0] == 'F' &&
      Data[1] == 'U' &&
      Data[2] == 'Z' &&
      Data[3] == 'Z';  // :‑<
}
It contains a very simple function that takes a pointer to a byte array Data, and the Size of the byte array. It returns 1 if the input is "FUZZ", and 0 otherwise. There's a simple bug in this function, and we'll use fuzzing to find it.
Step 3: Integrating Fuzzbuzz
First, we need to teach Fuzzbuzz how to compile our code, which usually comes down to running a single command. In this case, it's make. Running make in the project directory will output a broken.a archive that we could use in another project if we wished to call BrokenFunction.
To begin setting up the project, first make sure you've installed the Fuzzbuzz CLI. Then run fuzzbuzz init to have the CLI guide you through creating your fuzzbuzz.yaml file. If you wish, you may also read through the fuzzbuzz.yaml reference to create a configuration file manually, but we're going to stick with the easy path here.
To get started, run:
fuzzbuzz init
This will take you through a guided wizard, which will ask you what to name the configuration, the language you'd like to test, and how to build your code. We chose C, and just wrote make for our single build step:
Creating fuzzbuzz.yaml in /home/user/src/fuzzbuzz/getting-started-c
For more information on configuring your project to work with Fuzzbuzz, please visit:
    https://beta.fuzzbuzz.io/docs/reference/yaml

Project Name: getting-started-c
Project Language: C
Existing Tests: No
Build Steps:
    make

✔ Fuzzbuzz yaml created at /home/user/src/fuzzbuzz/getting-started-c/fuzzbuzz.yaml

That's it! If you'd like to modify or further configure Fuzzbuzz, you can edit the fuzzbuzz.yaml directly.

Now that Fuzzbuzz is configured, you'll want to write your first fuzz test.

Head over to https://beta.fuzzbuzz.io/docs/writing-your-first-test-in-c to learn more.

Then, run:

    $ fuzzbuzz build
    $ fuzzbuzz check

For further help, the Fuzzbuzz team is very active in Discord: https://discord.fuzzbuzz.io
This is the only configuration Fuzzbuzz needs to get started. If you look at the fuzzbuzz.yaml, you should see a file similar to:
cat fuzzbuzz.yaml
getting-started-c:
  language: c
  steps:
    - run: make
Fuzzbuzz will, in most cases, be able to automatically analyze, instrument, and fuzz your build without any extra tweaking or input. You can read about how this works in the Fuzzer Reference section.
Finally, run fuzzbuzz build to make sure the build compiles as expected.
Step 4: Adding a Fuzz Test
Now we've told Fuzzbuzz how to build our codebase, we need to actually add a fuzz test. To do this, run the following command, and select the BrokenFunction:
fuzzbuzz generate
This will output a file in the fuzz/ directory beside the fuzzbuzz.yaml. Fuzzbuzz will automatically compile all .cxx files in your fuzz directory to look for fuzz tests, so we can use this to keep all of our fuzzing-specific code in one spot. Take a look at the generated test:
cat fuzz/fuzzBrokenFunction.cxx
// Comments added for tutorial
// Include the Fuzzbuzz library used to control the fuzzer
#include "fuzzbuzz.hxx"

extern "C" int BrokenFunction(const uint8_t *, size_t);

// The FZBZ_TARGET_CLASS helper lets Fuzzbuzz know that
// it should fuzz test this class
FZBZ_TARGET_CLASS(FuzzBrokenFunction);
class FuzzBrokenFunction {
    // The constructor of this class takes a fzbz::Fuzzer, a handle that
    // allows configuration of the fuzz test
    FuzzBrokenFunction(fzbz::Fuzzer &f) {
        // Define the data the fuzzer should generate: in this case a byte array
        auto byte_array0 = fzbz::generator::byteArray<std::vector<uint8_t>>();
        // We can define settings on the byte array, such as a max length:
        // data.setMaxLength(100);

        // Create the fuzz "target" - this is the function that the
        // fuzzer will repeatedly call with generated inputs
        auto target = fzbz::fuzzTarget([](std::vector<uint8_t> Data) {
            BrokenFunction(Data.data(), Data.size());
        }, byte_array0); // a list of generators that correspond to the arguments of the function

        // Tell the fuzzer to begin fuzzing this target
        f.addFuzzTarget(target);
    }
};
This test includes the fuzzbuzz.hxx, which allows us to interact with and configure the fuzzer. It then creates a fuzz test, FuzzBrokenFunction, which creates a byteArray generator, and passes the byte arrays it generates into our BrokenFunction. There is no need to set up any compile commands or Makefiles, Fuzzbuzz will use the information it gathered by analyzing your build to compile these tests.
To make sure everything works as expected, run the fuzz command:
fuzzbuzz fuzz
Analyzing files...
✔ Analyzed 1 files
Found fuzz directory, building tests...
✔ Built 1 fuzz tests

Checking fuzz tests...
✔ Ran 10.5k tests on FuzzBrokenFunction in 20 seconds
All functions checked. Ready to submit to Fuzzbuzz!
You can run a single fuzz test continuously by providing its name as an argument:
fuzzbuzz fuzz FuzzBrokenFunction
Step 5: Log in to Fuzzbuzz
Head to https://beta.fuzzbuzz.io and log into your account. If you don't have a Fuzzbuzz account, you can request access here.
Step 6: Set up your Project
Fuzzbuzz integrates with your GitHub account to ensure it is always testing your latest changes. First, ensure the code and its fuzz tests is pushed up to a GitHub repository you control, and that it contains a fuzzbuzz.yaml at its root.
When you first log into Fuzzbuzz, you're presented with a blank homepage and an "Add New Project" button. Click this button, and select "Coverage Guided Fuzzer".
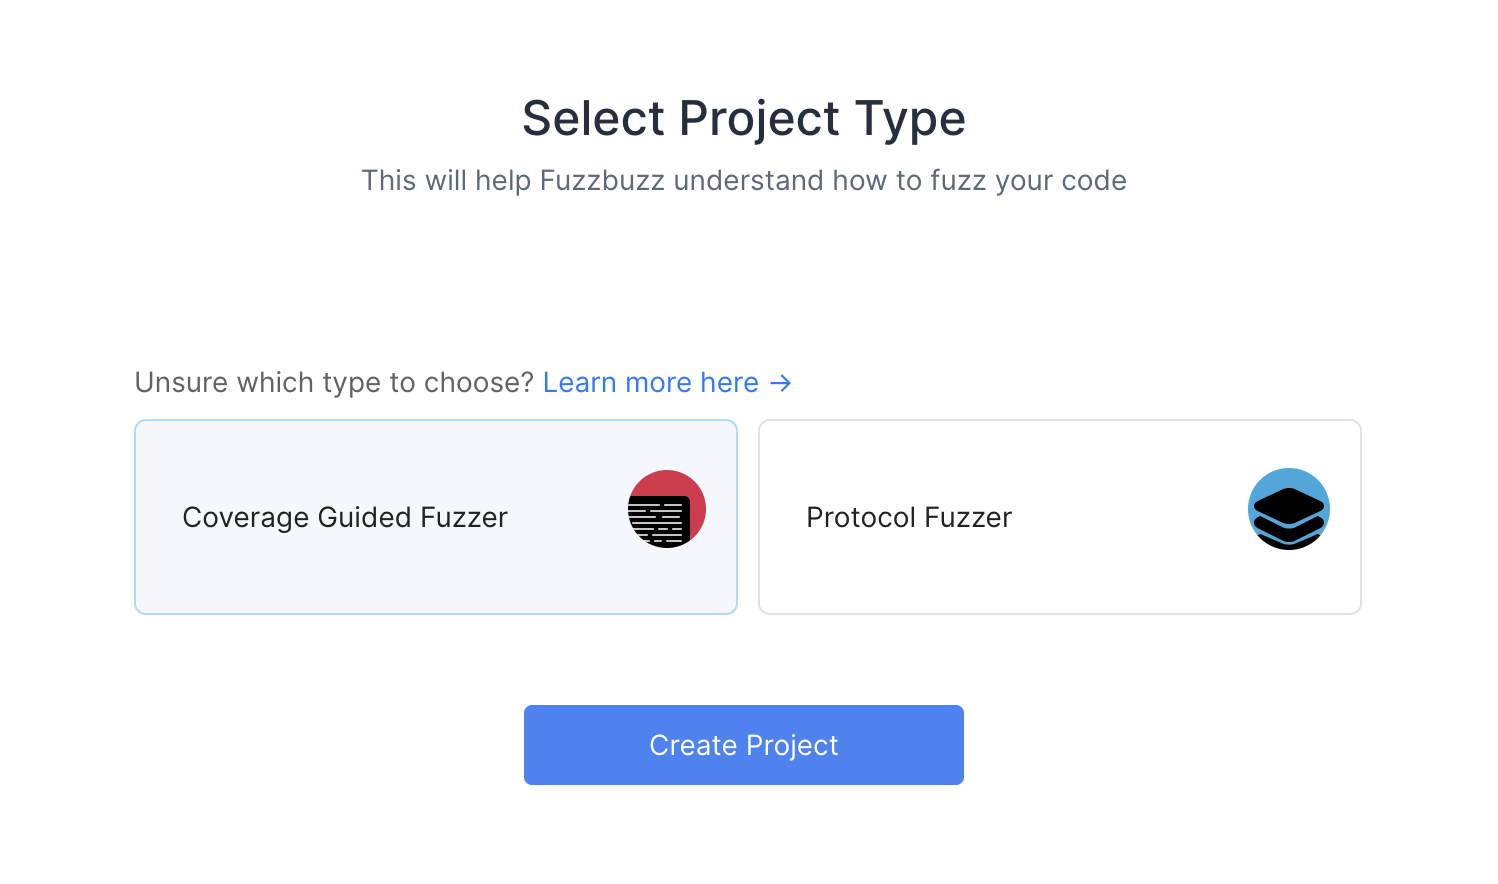
You'll then be presented with a Git Providers screen. Right now Fuzzbuzz supports GitHub, but GitLab and Bitbucket integrations are coming soon.
Select GitHub and press Next.
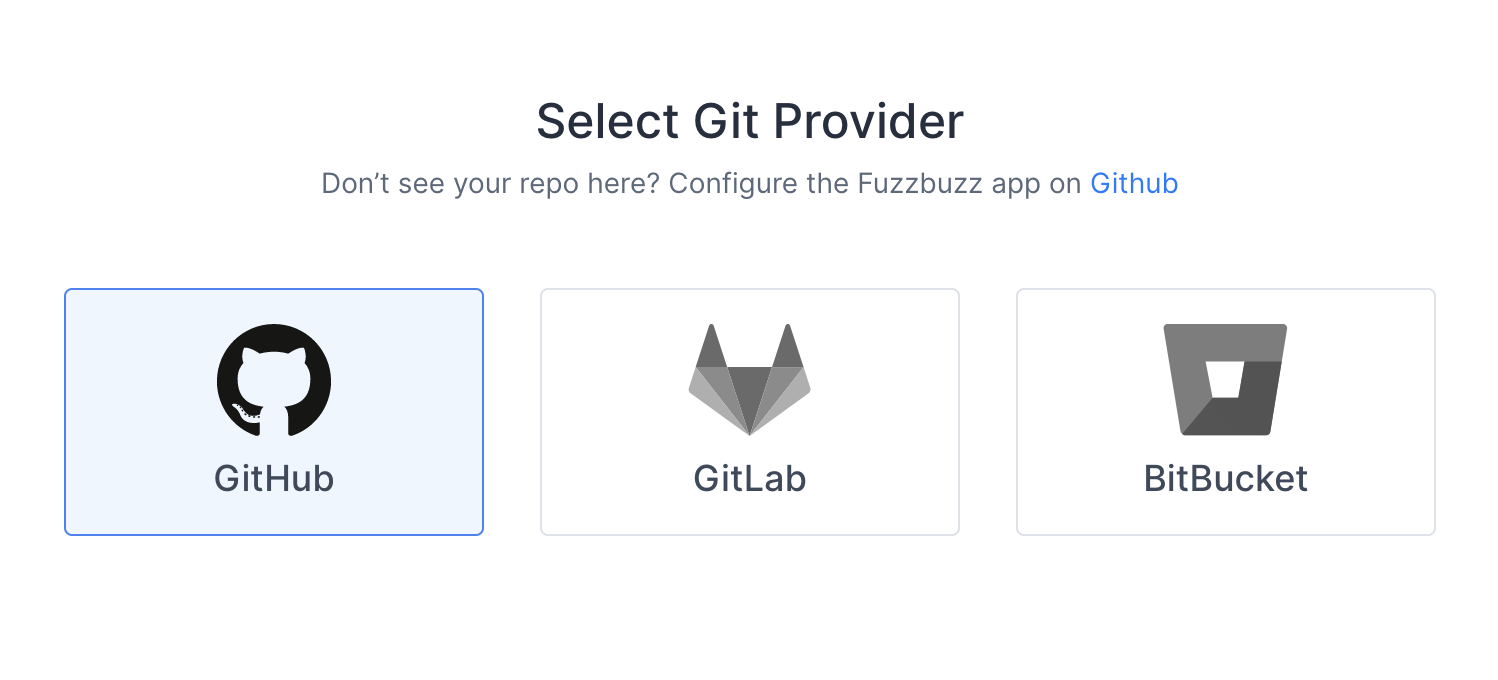
Finally, you will be redirected to GitHub to authorize the Fuzzbuzz app. This initial authorization is used to gather a list of the projects you have access to. You will then be asked to install the GitHub app on your organization or repository.
Once you're finished, select the project you wish to test.
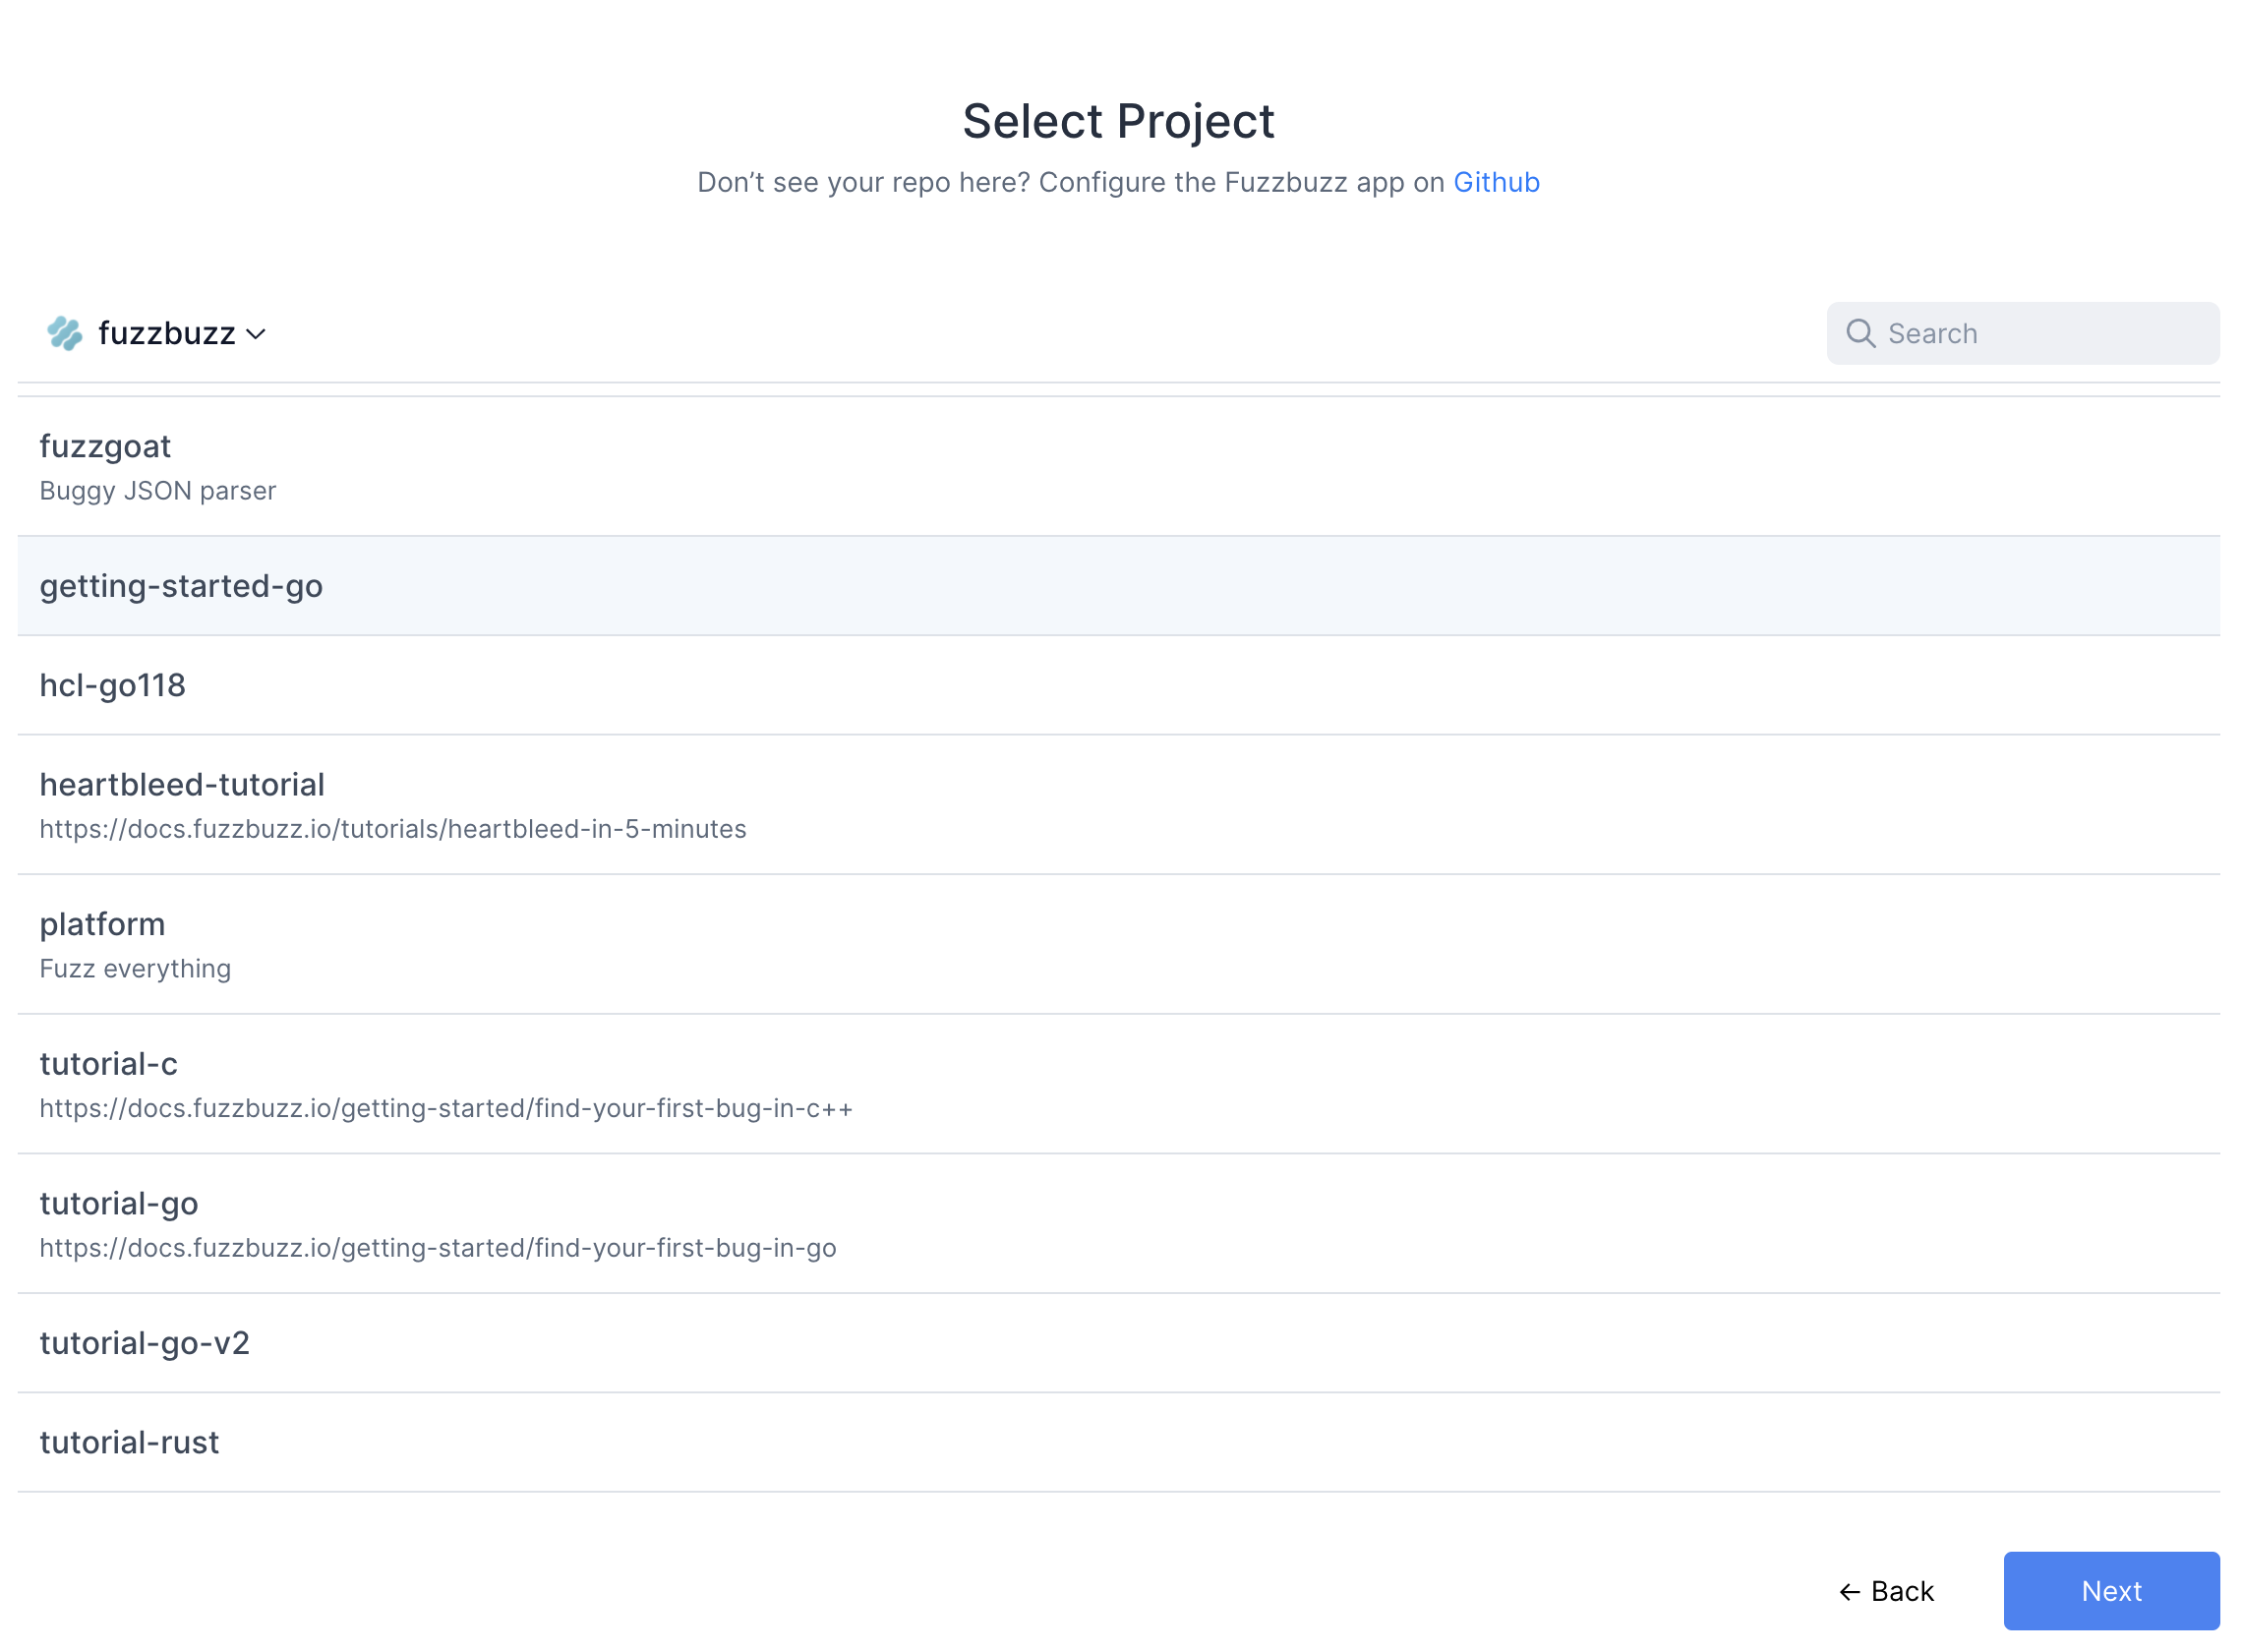
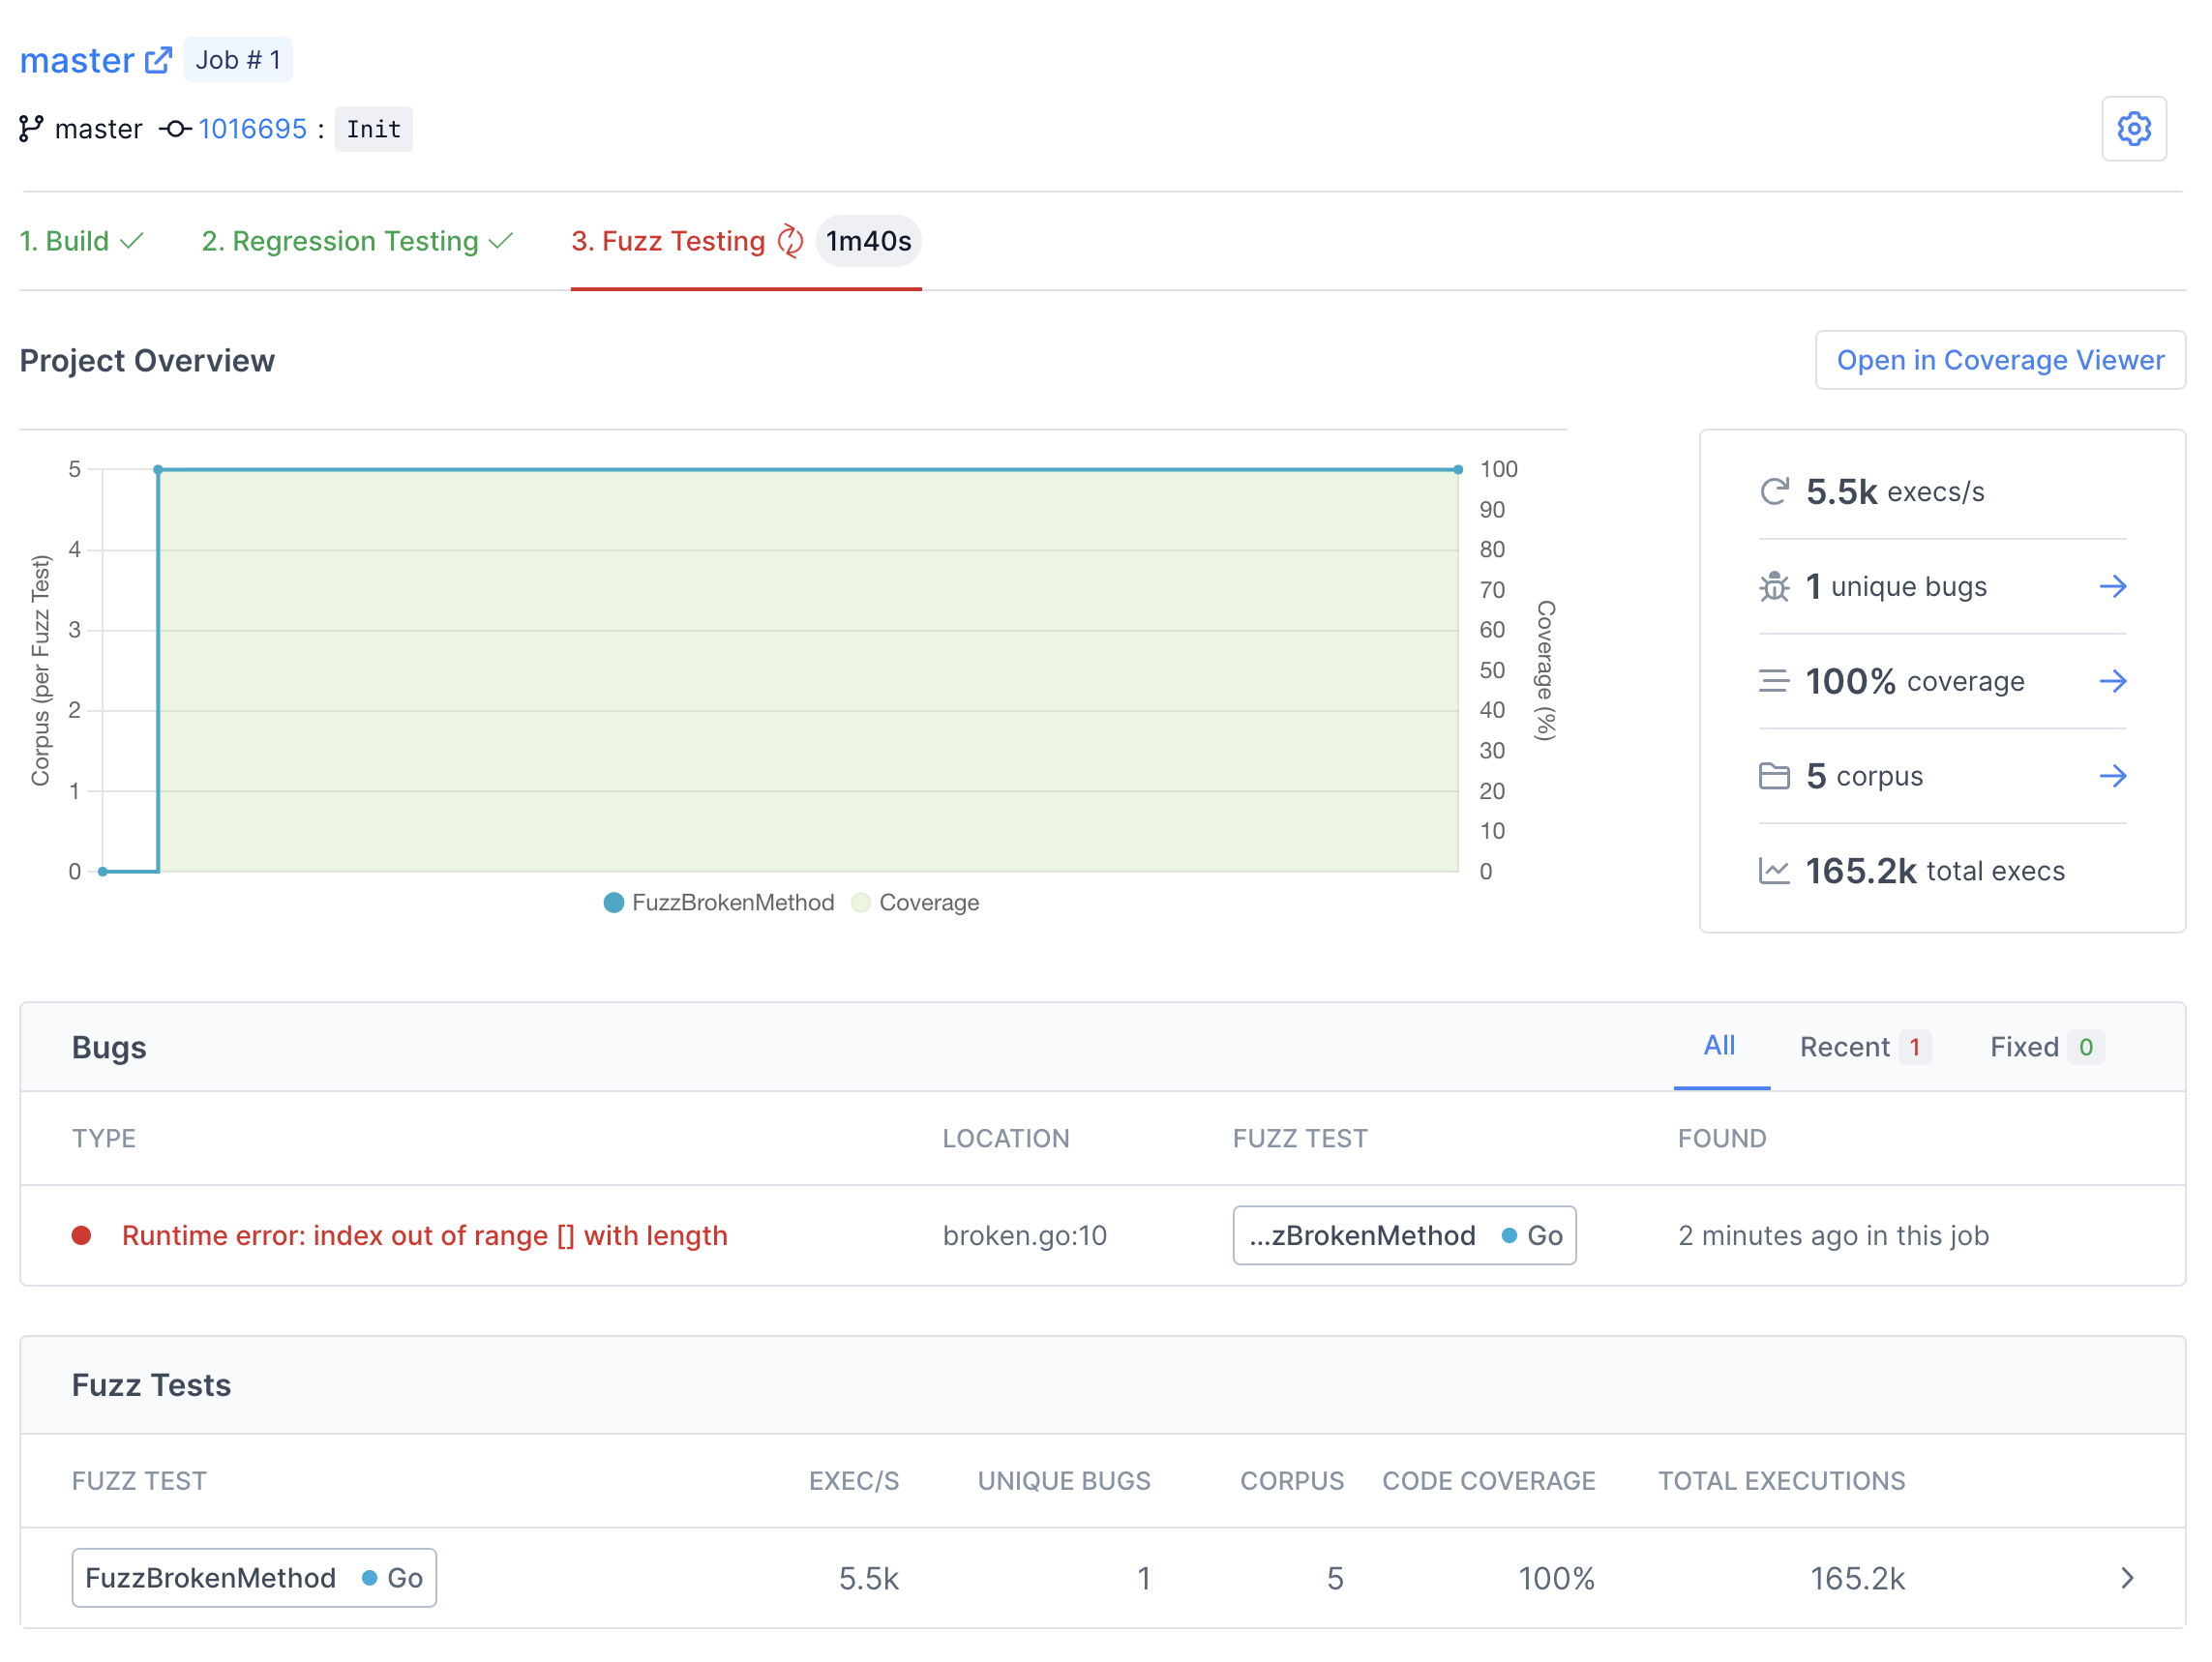
Fuzzbuzz will automatically detect your fuzzbuzz.yaml file, check it for any errors, and then begin building your code. You can click the job in the Overview page to watch the build logs as your fuzz tests are compiled.
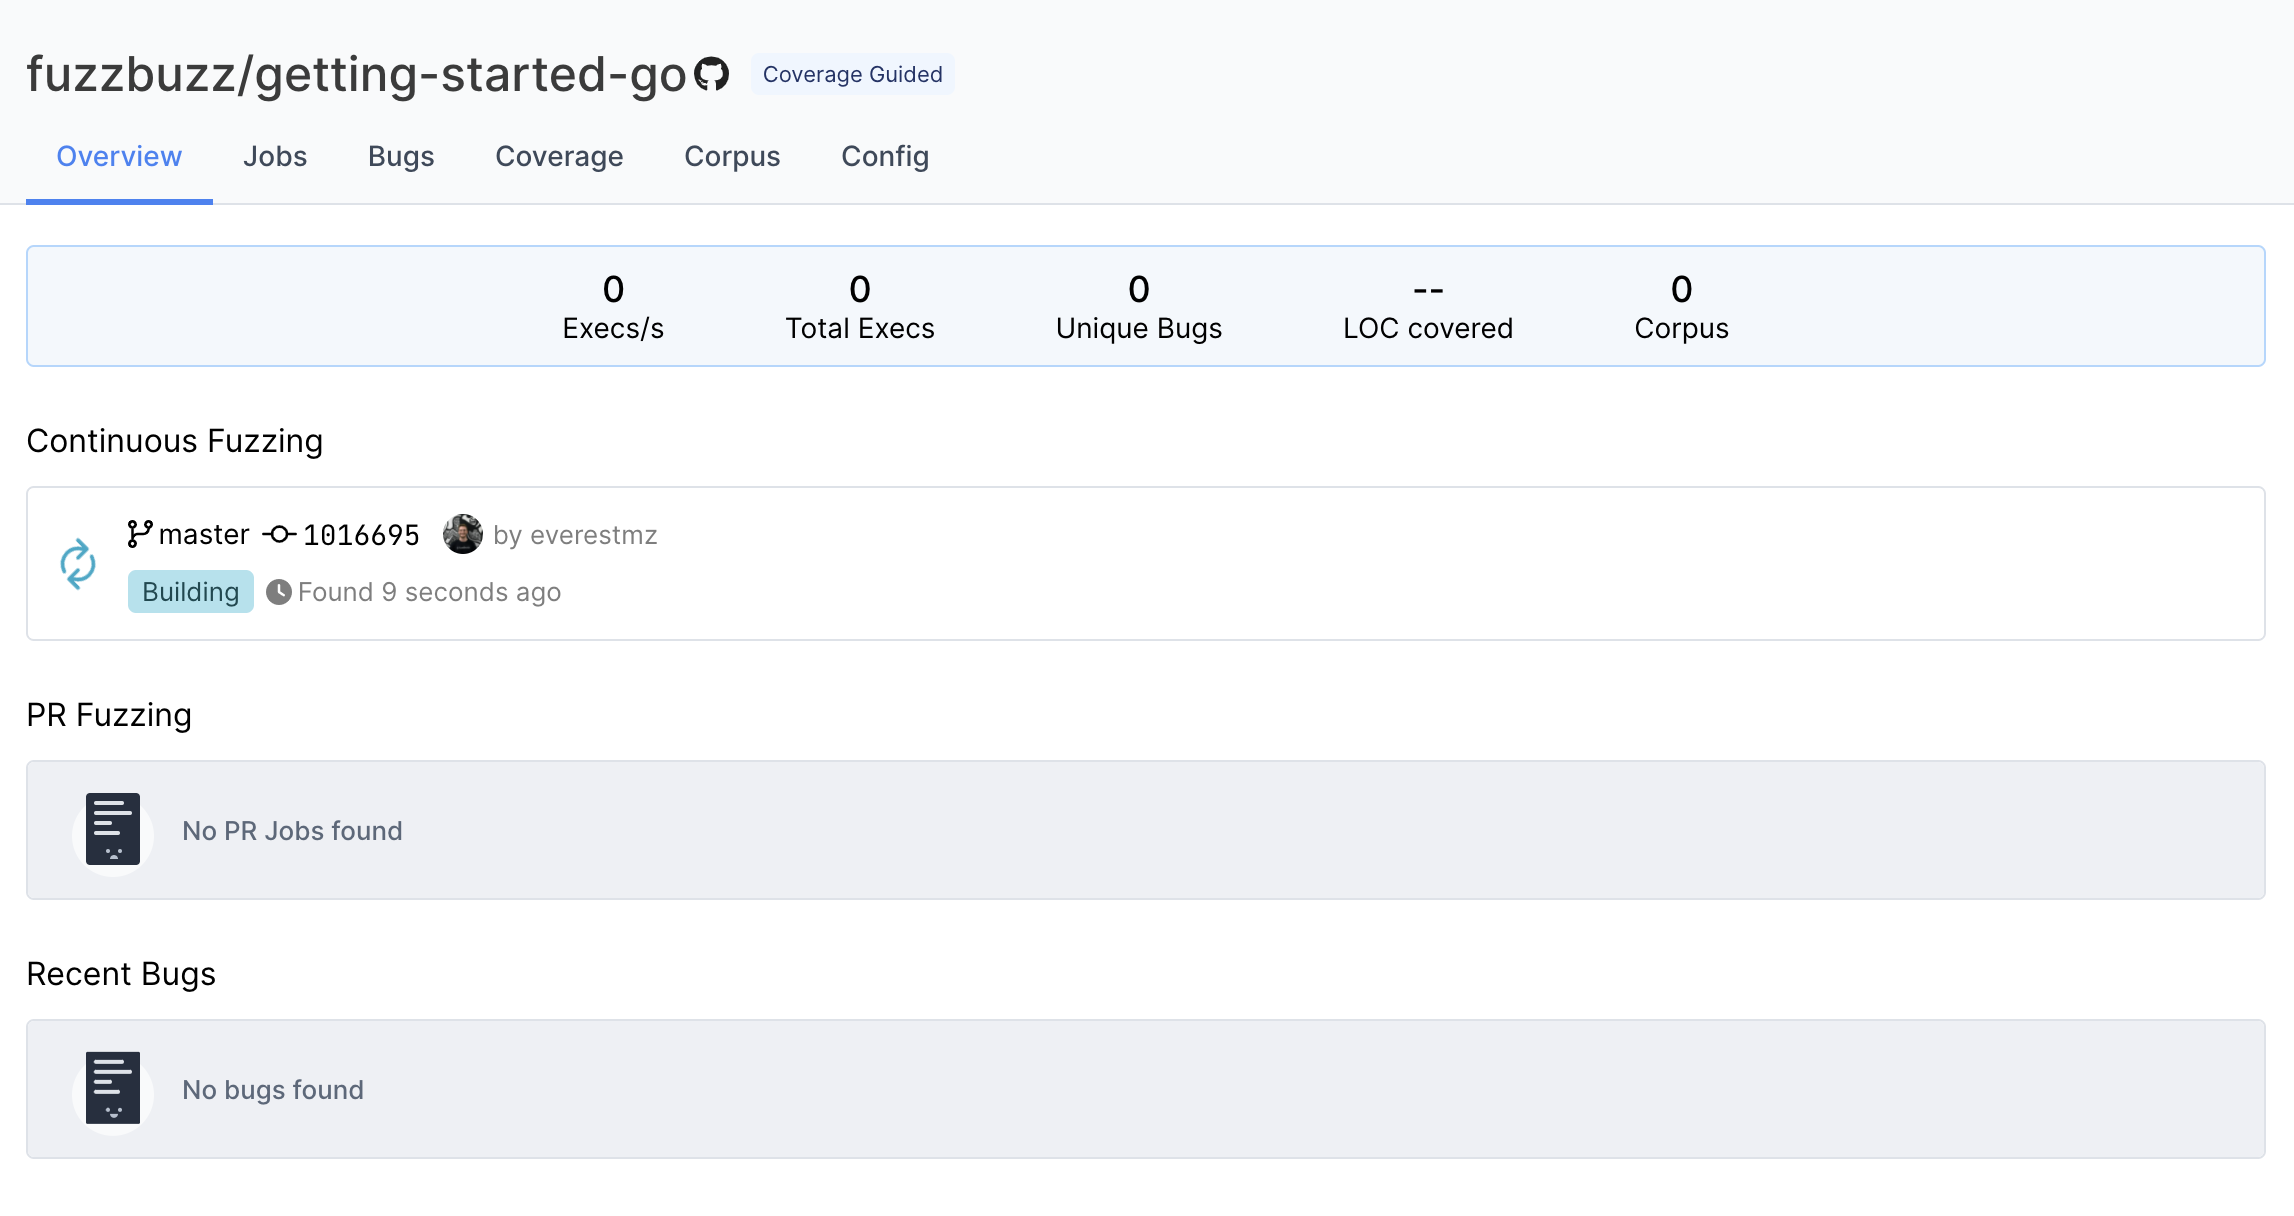
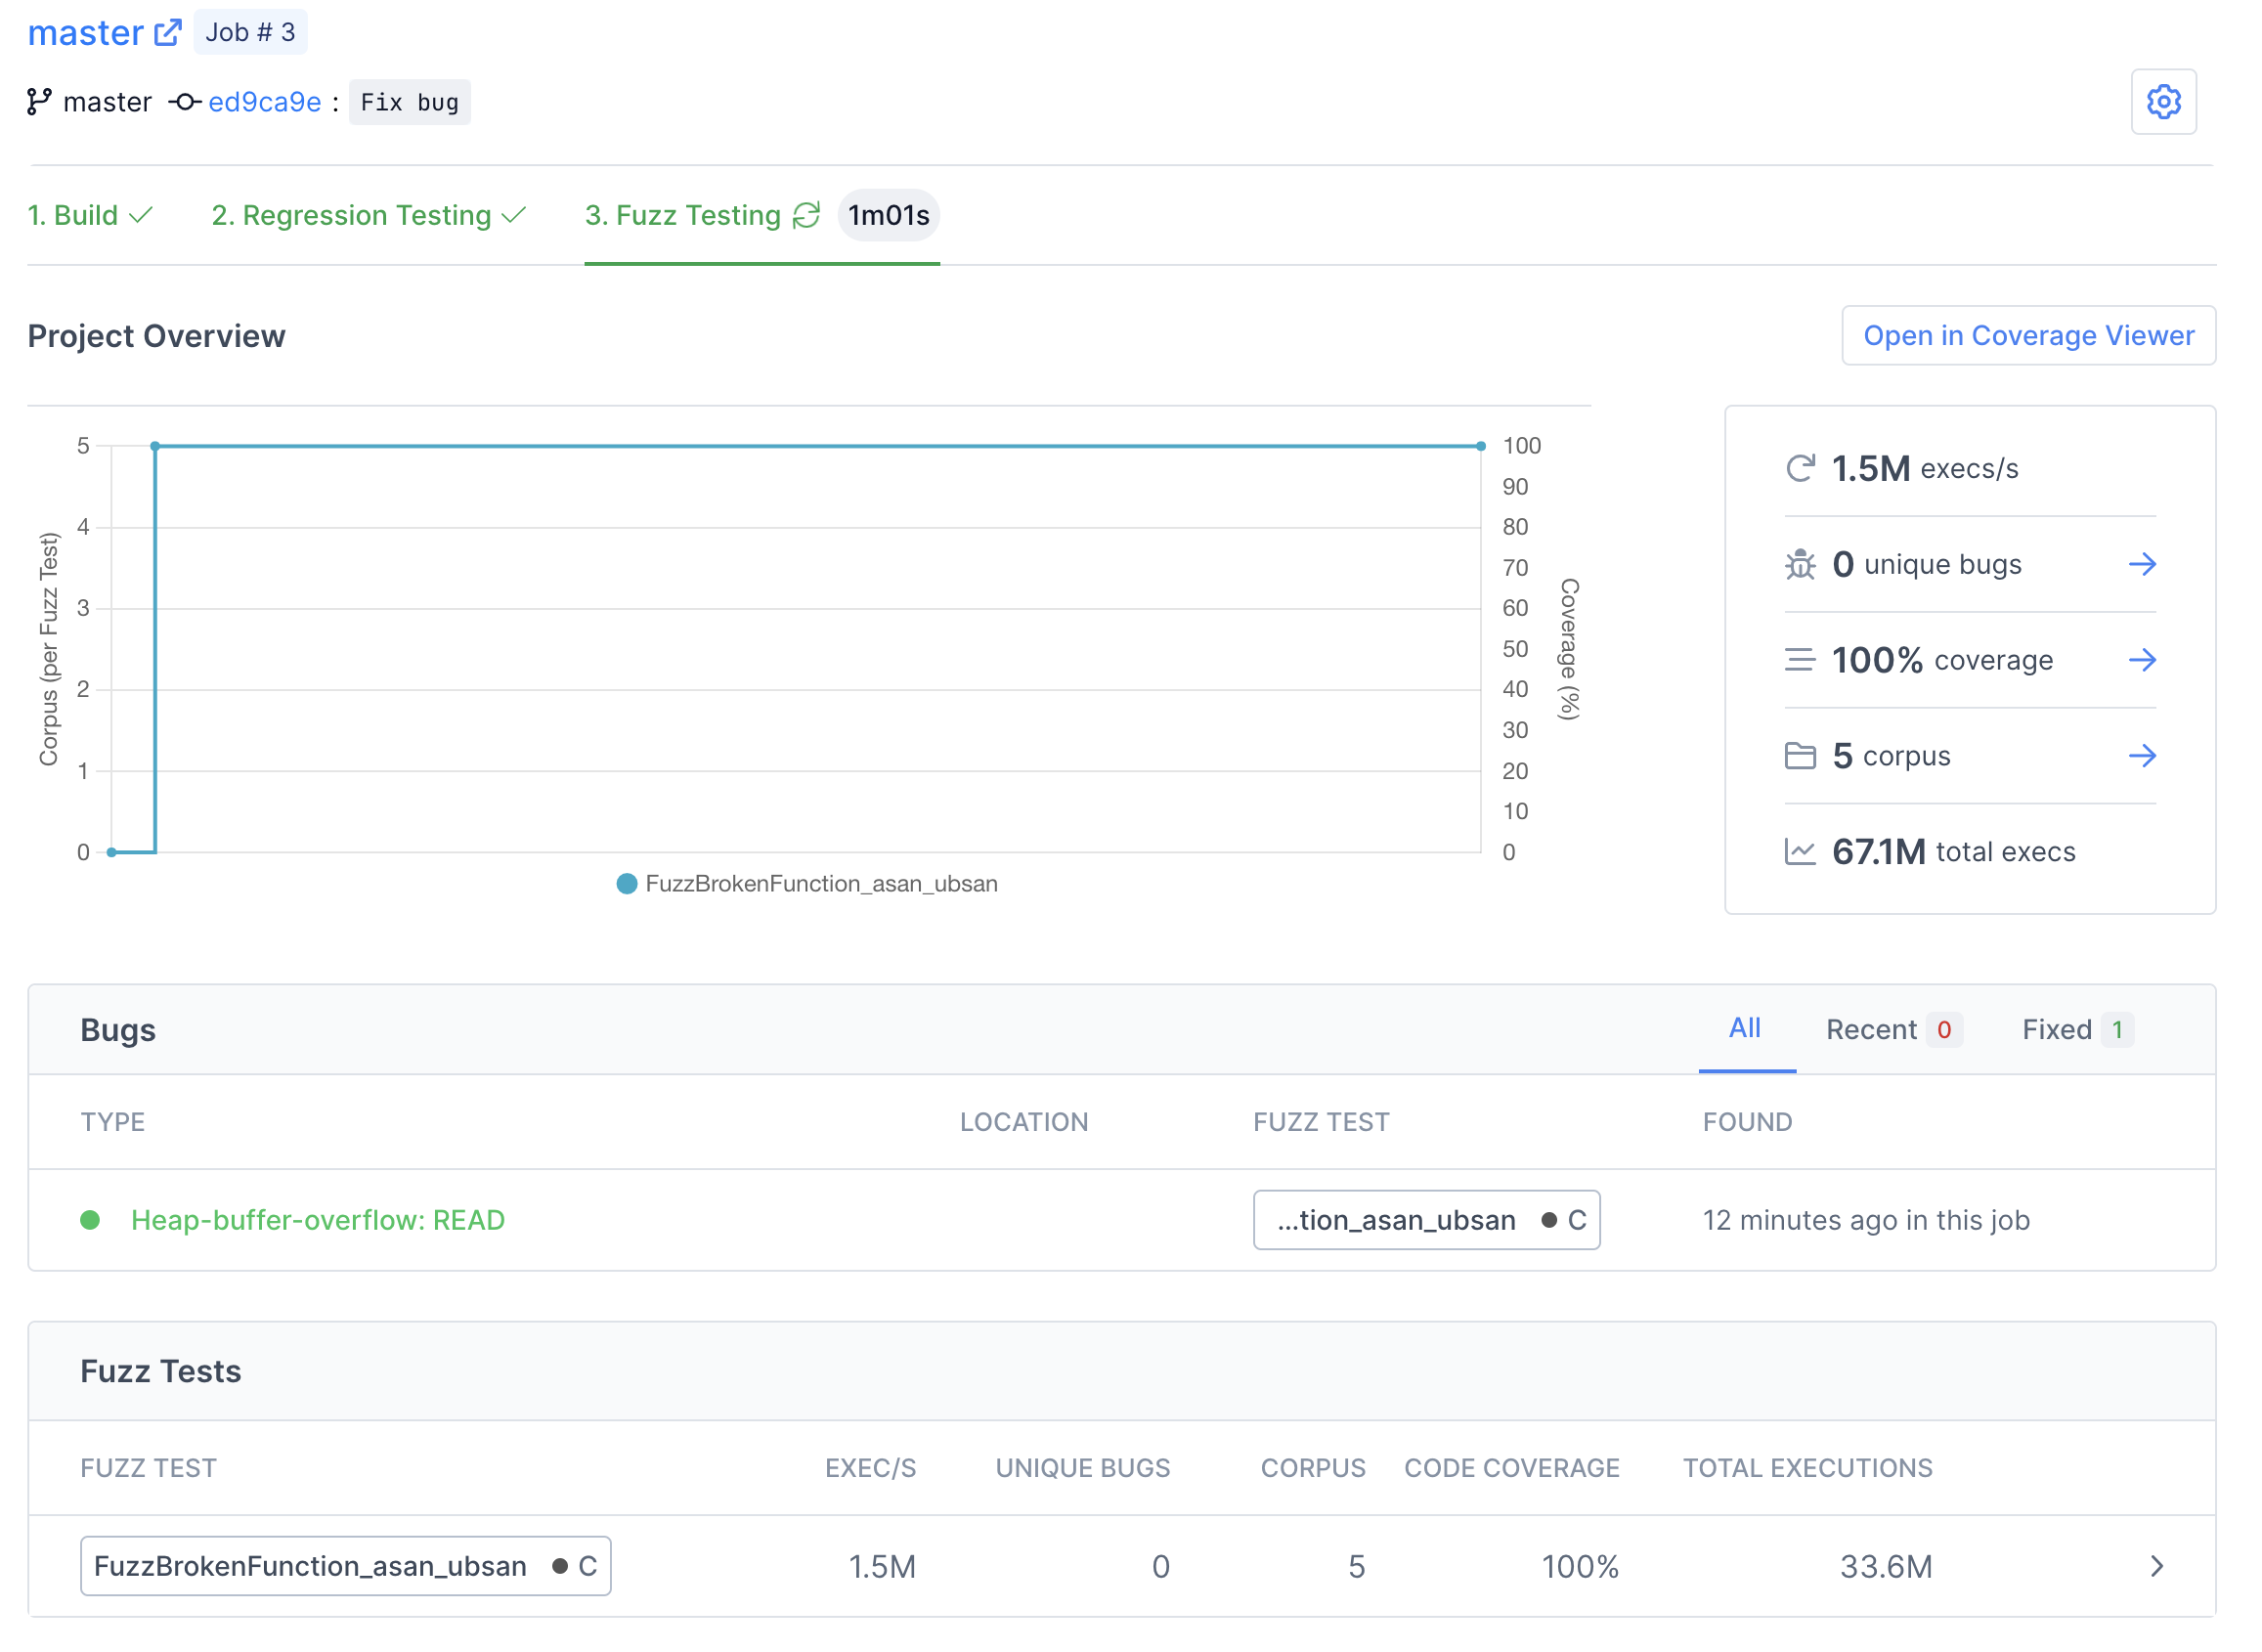
Step 7: Finding Bugs
When the build finishes, Fuzzbuzz will automatically detect any fuzz tests in your code, distribute them onto a cluster of CPUS, and begin testing them. Once your fuzz test has started running, you will see some general statistics about the progress the fuzzer is making, and after a few seconds you should see a bug appear. Congratulations - you've just found your first bug with Fuzzbuzz!
There are many details and features that we'll be skipping over in this tutorial. For more information about the capabilites and features of Fuzzbuzz, head over to the platform overview.
Click on the bug to view more details.
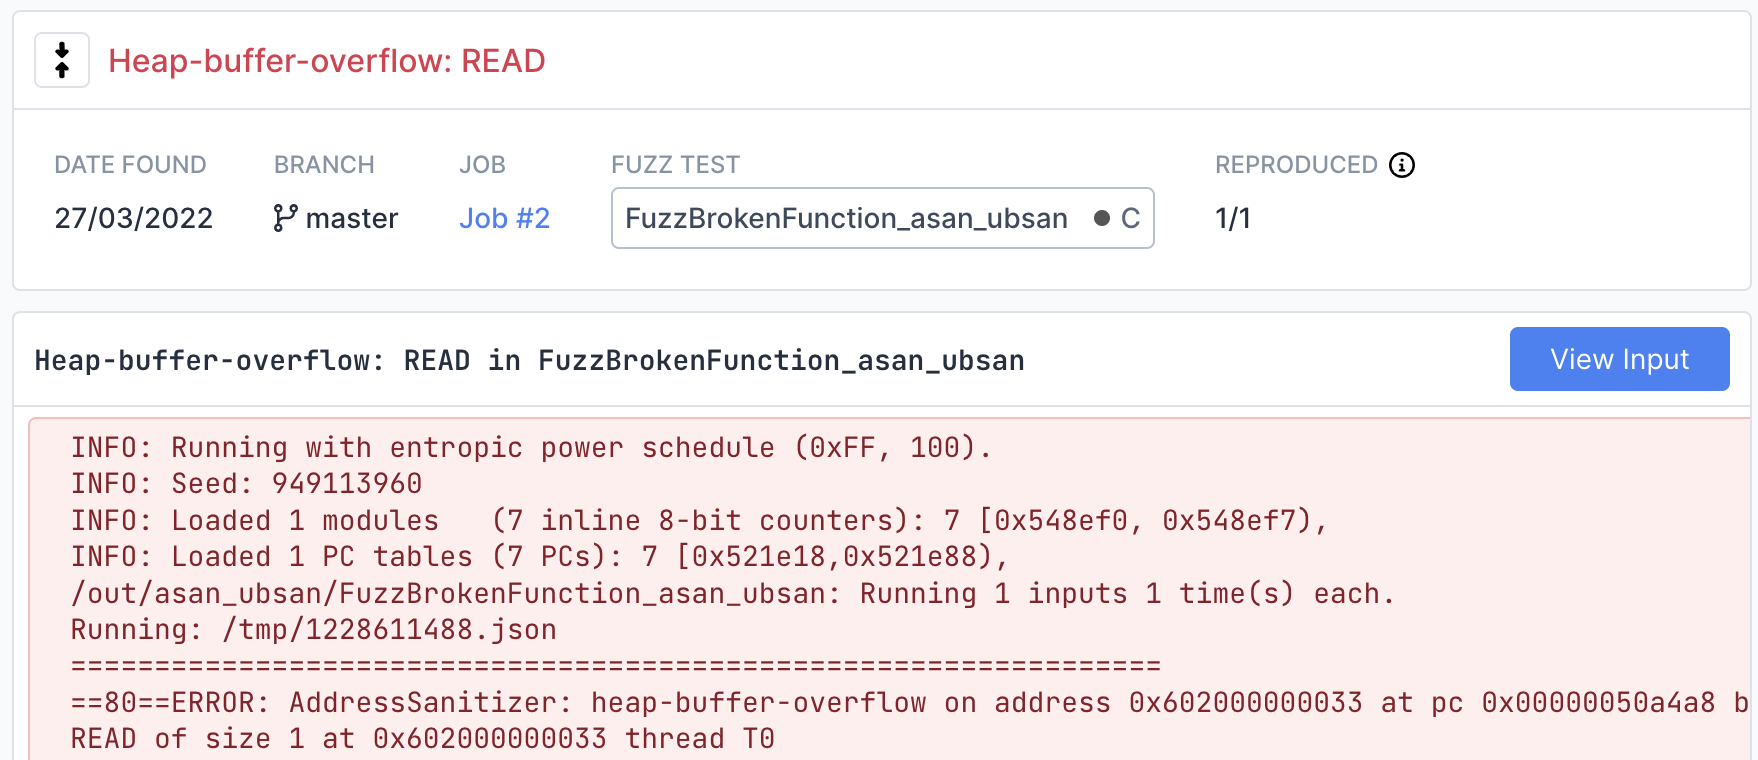
On this page you can find detailed information about the bug, including a stacktrace showing the exact line of code where the bug was encountered.
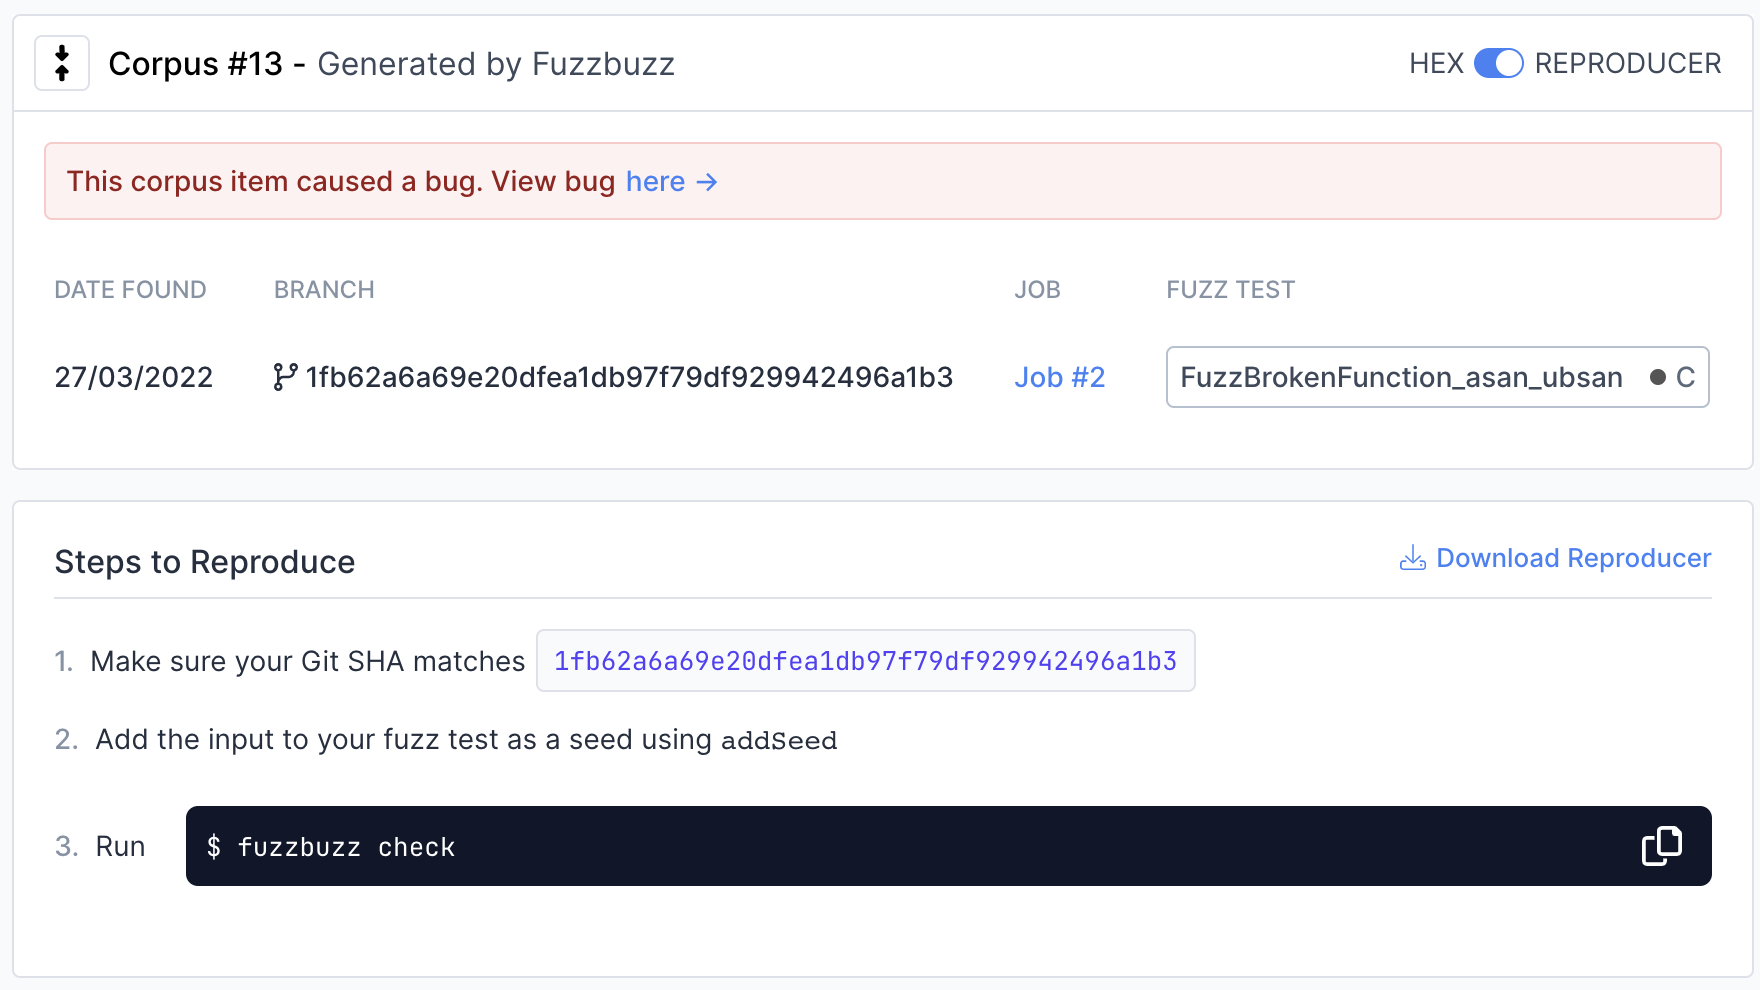
View the exact input that caused the bug by clicking the "View Input" button in the top right. If the fuzzer you are using is structured or supports multiple input values, this page will display each input separately in a structured viewer for easy inspection.
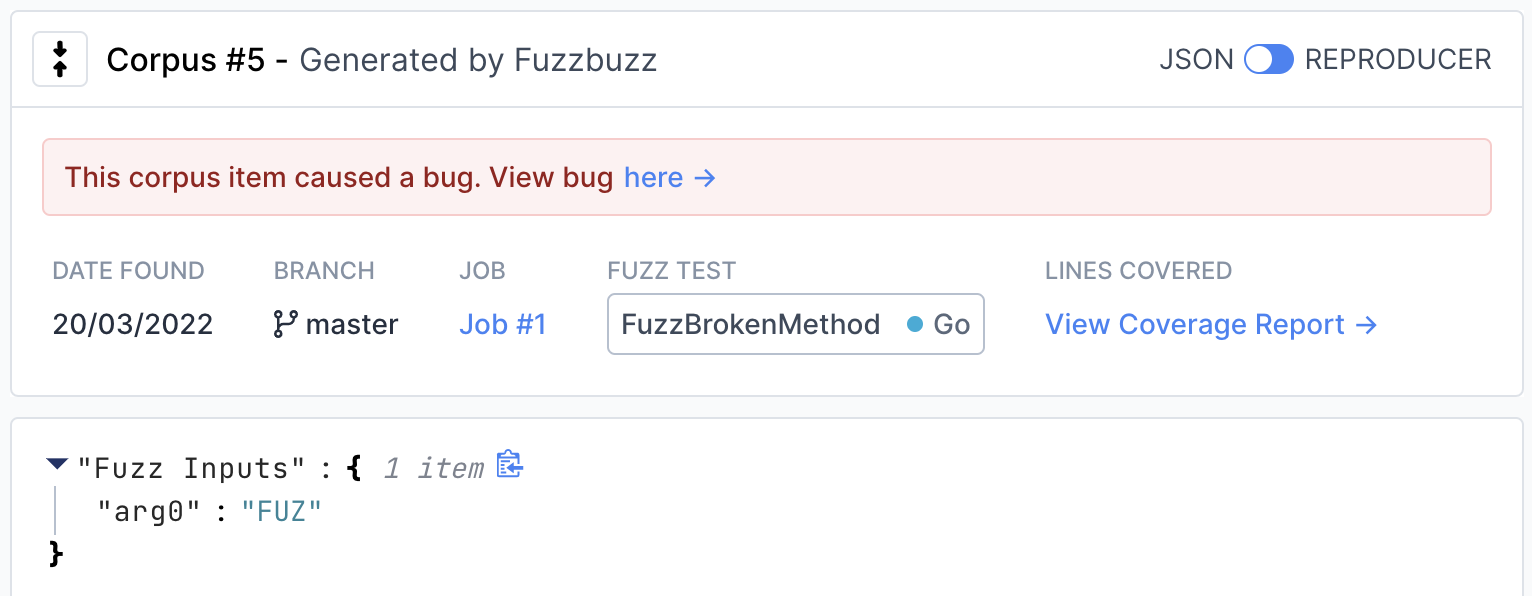
To view instructions on how to reproduce the input locally, move the switch in the top right from "JSON" to "Reproducer".
Step 8: Fixing Bugs
Now that we've found a bug, it's time to fix it. Open broken.c, and change the bounds check from >= to >, so the function looks like this:
#include <stdint.h>
#include <stddef.h>

int BrokenFunction(const uint8_t * Data, size_t Size) {
  return Size > 3 &&
      Data[0] == 'F' &&
      Data[1] == 'U' &&
      Data[2] == 'Z' &&
      Data[3] == 'Z';  // :‑<
}
Push your code back up to GitHub. Fuzzbuzz will automatically pick up your new change, rebuild your tests, and begin fuzzing the latest version of your code.
After the build finishes, you will notice a new Regression Testing tab.

Here you can watch Fuzzbuzz as it runs regression tests on your code. These tests consist of checking if any open bugs have been fixed, old bugs have been reintroduced, or if any previously-found corpus inputs now cause bugs. In this case, you should see the bug we found turn from red to green, indicating that it has been fixed by our most recent change.
Once regression testing has finished, Fuzzbuzz will automatically start fuzz testing your most recent commit.
Step 8: Next steps
You've learned the basics of how to set up fuzz tests on Fuzzbuzz! Consider checking out our Platform Overview for a more in-depth look at all the features Fuzzbuzz has to offer, like our code coverage viewer and integrations.